Understanding encryption and SSL
![]() his chapter describes the major
concepts of encrypted communications over both the Internet and an intranet
network. You should understand these concepts if you plan on using encryption
with your server. This chapter also describes how to activate SSL encryption
so the administration server can use encryption technology to protect privacy
while you configure your Netscape SuiteSpot servers.
his chapter describes the major
concepts of encrypted communications over both the Internet and an intranet
network. You should understand these concepts if you plan on using encryption
with your server. This chapter also describes how to activate SSL encryption
so the administration server can use encryption technology to protect privacy
while you configure your Netscape SuiteSpot servers.
New in 3.x
The 3.x version of the administration server is used to install and manage the key-pair files and certificate files that can be used by all Netscape SuiteSpot servers. If you already have certificates for your 2.x servers, you can use them with 3.x servers by converting the existing certificate and key-pair files. See Converting 2x certificate databases for directions.
Netscape servers use a communication system called Secure Sockets Layer (SSL) to ensure privacy when communicating with other SSL-enabled products, such as other servers, Netscape Navigator and Netscape Communicator.
Internet security issues
Information sent from one computer to another can pass through numerous other computers before it reaches its destination. Normally, the users of these intermediary computers don't monitor the Internet traffic that routes through them, but someone can intercept and eavesdrop on your private conversations or credit card exchanges. Worse still, eavesdroppers might replace your information with their own and send it back on its way. Because of the architecture of the Internet and intranets, there will always be ways for unscrupulous people to intercept and replace data in transit.
Fortunately there are ways to safeguard privacy over the Internet. You encrypt, or disguise, your information before you send it over the Internet. That way, if someone intercepts it, the data is meaningless. And, if the intercepted data is changed, the intended recipient will know it was altered.
Without security precautions, you might encounter three types of problems when you send information over the Internet or an intranet.
- Eavesdropping. Information remains intact, but its privacy is compromised. For example, someone could learn your credit card numbers, spy on an intimate conversation, or intercept classified information.
- Modification. Original information is changed or replaced and then sent to the recipient, who is none the wiser. For example, someone could alter an order for goods or change a person's resume.
- Impersonation. Information passes to a person who poses as the intended recipient. Impersonation can take two forms:
- A person can pretend to be, for instance, jdoe@mozilla.com, or a computer can identify itself as a site called www.mozilla.com when it is not. This type of impersonation is known as spoofing.
- The second type of impersonation is more subtle. For example, suppose the site www.mozilla.com pretends to be a furniture store when it is really just a site that takes orders (and gathers credit card numbers) but never sends any goods. You can reduce these threats by using SSL for all communications.
Taking precautions
The Secure Sockets Layer (SSL) protocol used in Netscape products provides several features that safeguard against the threats listed previously.
- Confidentiality is ensured through encryption, the process of disguising information so that it can't be deciphered (or decrypted) by anyone but the intended recipient. If the information is intercepted, it will be unreadable by a third party. The only information that can be discovered is that the two parties are communicating.
- Integrity is also ensured through encryption. If someone attempts to alter an encrypted message, it will not decrypt correctly, alerting the recipient to the fact that someone has tampered with the message.
- Authentication is provided through digital authenticity certificates, which are very difficult to falsify. You purchase or otherwise receive a certificate from a third party that both parties trust. Digital certificates help ensure that users or computers are who they say they are. In this way, the certificate acts as a sort of digital identity badge or passport. The technical implementations of encryption and authentication are discussed in the next sections, followed by a discussion of how all the elements work together in SSL.
What is encryption?
Encryption is the process of transforming information so it can't be decrypted or read by anyone but the intended recipient. This disguised information is called ciphertext. It is the ciphertext that you send across the Internet. For example, suppose you have a financial report stored at your web site. If SSL is enabled on your web server, your server encrypts the report and sends the ciphertext to a client, who turns the ciphertext back into the financial report. Figure 5.1 shows the encryption process.
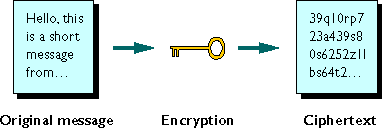
Decryption reverses the process, turning the ciphertext back into the original message. Only the recipient can decrypt the text because only the recipient has a key. Only someone with the correct key can "unlock" a message. (To see how encryption is able to resist "brute force" attacks by someone without the key, see "How does encryption work?" on page 86.)
In fact, both the encryption and the decryption processes require keys, and sometimes use the same key. Symmetric encryption is like a combination lock protecting a safe--the same combination is used to secure and retrieve something. Netscape servers use symmetric encryption as part of the SSL process, which also includes public-key encryption (see the following section).
One problem with symmetric encryption is that anyone who uncovers the key can decrypt your messages, as well as encrypt new messages so they would appear as authentic as yours. This same person could edit or replace messages in transit from you to your intended recipient.
You can avoid this problem by using different keys for encryption and decryption. Then you would have a system like the one described in the following section.
Public-key encryption
In public-key encryption, you use two keys: one for encrypting data and another for decrypting it. One key is called the public key, and the other the private key. Either key can be used to encrypt or decrypt a message. That is, if the public key encrypts a message, the private key must be used to decrypt it. The server stores both keys in the file: <server_root>/alias/<alias-name>-key.db. You should protect the key-pair file using your operating system security features--that is, make it readable only by the administration server and consider write-protecting it.
Public-key encryption is one of the processes that SuiteSpot servers use to exchange data. Here's how public-key encryption works with a server.
- Your server uses two keys, a public key and a private key, which are
stored in a single file.
- Your server sends only your public key to any client that requests
it, such as Netscape Navigator or Netscape Communicator. The server never
sends the private key.
- Any client can use your public key to create ciphertext that can be
decrypted only by your server using its private key. Conversely,
if your server receives a client's public key, your server can encrypt
messages that only that client can decrypt using its private key.
As with any encryption process, as long as you actually keep your private key private, your encrypted messages are safe from tampering. Even an eavesdropper who gets both the public key and the ciphertext can't work backwards and discover your private key or your original message. In Netscape servers and clients, you have the additional safeguard of password protection before your private key can be used by the application--with servers you enter the password when you start your server, not every time a secure connection is requested by a client.
What keeps public-key encryption secure is that you never share your private key with anyone, so no one can ever decrypt your messages. If anyone gets your private key (that is, they copy the <alias>-key.db file), you must immediately create a new key-pair file.
How servers use encryption
Public-key encryption takes longer than symmetric encryption. However, client-server communication with SSL uses both types of encryption together to maximize their strengths. Here's how these processes are leveraged: A client and server exchange public keys (public-key encryption), and then the client generates a symmetric encryption key that is used only for a single transaction (symmetric encryption). This key is called a session key. The client encrypts the session key with the server's public key and sends it to the server. When the server receives the session key, it uses it's private key to decrypt it. For the rest of that transaction, the client and the server can use the quicker symmetric encryption.
Your server can perform encryption with a number of different encryption functions, called ciphers. Some ciphers are stronger--that is, more resistant to cracking--than others.
During an SSL connection, the client and the server agree to use the strongest cipher they can both communicate with.
Signing files
Public-key encryption also lets you create a message that anyone can decrypt, but that only your server could create. This occurs by simply reversing the use of the keys: the server encrypts a message using its private key--that way, anyone with the server's public key can decrypt it. Because only a message encrypted with your server's private key can be decrypted with its public key, that message is guaranteed to be from your server.
You can use this "proof of sender" feature of public-key encryption in conjunction with the ability to guarantee message integrity. This is called authentication. You can do this without disguising the contents of a file. This process is called signing a file. When you sign a file, you guarantee message integrity as with normal encryption, but without forcing the recipient to decrypt the message to read it. To the recipient, the signed message appears as a normal unencrypted message with a section of encrypted text after it. Even though the message itself isn't encrypted, you still decrypt the section to make sure that the digital signature matches the message. If the message has been changed since the file was signed, the signature will not decrypt correctly.
When you sign a file with your private key, you are sending out a public message, readable by anyone, that can be proved to be from you because it can only be decrypted with your public key. When the server requests a certificate from a CA, it "signs" the request. This way the CA knows that the request for the certificate could only come from the server.
How does encryption work?
This section explains how encryption works. You don't need to know these facts to operate an SSL-enabled server, but if you want to know about the mathematical underpinnings of this system, this section will introduce them to you.
It might seem odd that you can give an eavesdropper both your public key and a sample of your ciphertext and still be sure that your original message and private key can't be discovered. This is the case, though. Here's why.
The encryption keys discussed in the previous sections are complex mathematical functions that are easy to compute in one direction, and extremely difficult to compute in the reverse. That is, it's easy for a computer to figure out the ciphertext when presented with the original message and the encryption key, but very difficult to figure out the original message with only the ciphertext and the encryption key. Because all data stored in computers can ultimately be expressed numerically, you can perform mathematical functions on any information on your computer.
Here's an example of a simple mathematical function:
This is an easy equation to reverse. If you know c (the ciphertext), you can figure out m (the message). In fact, even if you kept this equation (that is, the key) secret, someone could figure it out relatively quickly by examining your ciphertext for patterns.
The types of functions used in public-key encryption are vastly more complex than the previous example. They are, also, resistant to pattern searches because they use prime numbers in their calculations. (A prime number is divisible only by itself and 1.) The first ten prime numbers are 2, 3, 5, 7, 11, 13, 17, 19, 23, and 29. The number 6 is not prime because it can also be divided by 2 and 3. There are no patterns for determining prime numbers, so if you use an encryption key that uses prime numbers in the right manner, examining the ciphertext for patterns does no good. In fact, the SSL protocol uses a number of different types of encryption keys throughout its sequence.
If it is next-to-impossible to determine the original message once it's in ciphertext, how is the private key holder able to uncover it? It's because the private key is also a complex mathematical function, one that is incorporated into the function of the public key as a built-in shortcut to "solving" the public key function (or turning the ciphertext back into the original message). Even if someone gets your public key, it's as difficult to determine what that corresponding private key is as it is to determine the original message from the ciphertext and the public key.
How safe is encryption?
Technically, it's not impossible to "crack" ciphertext and determine the content of the original message--it just takes a lot of time and money. For example, it would take a single Pentium-based computer more than a billion years to crack the 128-bit encryption.
Of course, you could use several computers in conjunction. For example, if you dedicated ten computers to cracking that same encryption, it would take you one-tenth the time. Even then, only the single message in question would be deciphered because SSL generates a new encryption key for every exchange. (For more details, see "Putting all the pieces together: SSL" on page 100.)
The precise level of security a key offers is measured by the size of certain numbers used in creating the key. These numbers are measured in bits. The greater the number of bits, the more secure the key. The key used in the previous example is a 128-bit key, which is so strong that the United States government doesn't allow products containing it to be exported. International versions of Netscape products are limited to 40-bit encryption keys. This is still strong enough to stop most hackers. However, it is conceivable that someone could use 100 dedicated computers working together to crack it more quickly. Of course, the cost of making such powerful machines unavailable for other tasks for that amount of time would be very high indeed--probably millions of dollars. Finally, keep in mind that new computing power tends to double every 18 months. The encryption that keeps you safe today may not hold up to cracking 10 years from now.
When considering encryption, remember that the trade-off is the value of the information versus the cost or time to crack the encryption. If the information is worth less than what it would cost to crack the encryption protecting it, then you are probably safe. Still, it's always a good idea to use the strongest encryption possible.
Authentication and certificates
Over the Internet and smaller intranets, identification takes the form of an authentication certificate, or simply, a certificate. It is a nontransferable, nonforgeable file issued from a third party that both communicating parties already trust. This third party is known as a Certification Authority, or CA.
A CA can be a company that sells certificates over the Internet, or it can be a department responsible for issuing certificates for your company's intranet. You decide which CAs you trust enough to serve as verifiers of other people's identities. (See "Choosing Certificate Authorities.")
Both clients and servers can have certificates. Also, clients can have multiple certificates, much like a person might have several different pieces of identification. When a server sends its certificate to a client, the process is called server authentication. When a client sends a certificate to a server, the process is called client authentication. For example, if you participate in newsgroup discussions with a Netscape Collabra Server called news.mozilla.com, you might find it possesses a certificate issued from a company named CertSafe, assuring you that this site is the one true news.mozilla.com. If you trust CertSafe's judgment, then you can trust that news.mozilla.com is the site it claims to be.
Conversely, you might be in charge of a company's internal Human Resources server. You could use your server's access-control features in conjunction with client authentication to allow only Human Resources employees access to certain directories. (For more information on access control, see Chapter 4.)
When SSL is enabled on a server, server authentication is accomplished with these steps:
- A client requests a connection with an SSL-enabled server.
- The server signs but does not encrypt its certificate and sends it
to the client.
- The client uses the server's public key, which is included in the certificate
file, to verify that the owner of the certificate is the same one who signed
it. See "Public-key encryption"
and "What's in a certificate?".
- The client checks whether the certificate's CA is one that it accepts.
If so, the client proceeds to the next step; otherwise, the client program
informs its user that this certificate was issued by an unknown CA.
- The client compares the information in the certificate with the information
it just received about the server. If all the information matches, the
client accepts the site as authenticated.
Note that the preceding steps are a simplified version of what occurs during server authentication. In addition, there is also the possibility of certificate chaining. - A client (such as Netscape Communicator) requests a connection with
the server.
- The server is authenticated or not (through the previous steps).
- The client signs but does not encrypt its certificate and sends it
to the server.
- The server uses the client's public key, which is included in the certificate
file to verify that the owner of the certificate is the same one who signed
it.
- The server attempts to match the CA to a trusted
CA. If the client's CA isn't listed as a trusted CA, the server ends
the transaction. The server logs an error (with code -8179) and returns
this message to the client: "The server cannot verify your certificate."
- If the client's CA is trusted, some servers fulfill the transaction;
whereas some servers attempt to match the information from the certificate
with an entry in the LDAP directory. If all the information matches, the
server accepts the client as authenticated. If entries in your LDAP directory
contains certificates, some servers can compare the sent certificate with
the one in the LDAP directory, and if they match, the user can get access.
Server and client authentication is not essential to an SSL connection--you can still exchange encrypted information--but it does give extra assurance to both parties that they are sending the encrypted information to the correct parties. Also, although a client and server can communicate without authentication, if your server requires client authentication for access control, the client will be rejected if it doesn't have a valid certificate.
Client authentication is accomplished with these steps:
Note
Your company might have a department that functions as a CA, issuing certificates to all internal clients and servers. However, you might find that your company's certificate isn't accepted outside your company. In this case, you might want to purchase a certificate from an outside CA company. See "Choosing Certificate Authorities" for more information.
Chaining certificates
During an SSL connection, your server sends its certificate to the client. If the client does not recognize the certificate's CA, the client might end the connection. However, if the client supports certificate chaining, the SSL connection can continue at the client's discretion. Certificate chaining is the process of presenting your CA's certificate in addition to your own. If the client trusts the CA who issued the certificate to your CA, the transaction will continue. In this way, a chain of trust is created: the client trusts the second CA, who trusts the first CA, who trusts you. Therefore, the client trusts you.
For example, say your certificate is issued from a certification authority named CertSafe. When you present your certificate, the receiving client doesn't initially accept CertSafe as a trusted CA. However, you also present CertSafe's own certificate, issued from a CA named Global Certificates. The client does accept Global Certificates as a trusted CA. Additionally, the client has been preset to trust any CAs that Global Certificates verifies as CAs. So CertSafe is accepted as a trusted CA. Therefore, your certificate, issued by the now-trusted CertSafe, is accepted for this transaction.
Certificate chaining can be extended beyond your CA and your CA's CA. You could keep any number of certificates. Your server knows to send all of these certificates when your certificate is sent to a client. A client then checks each certificate--working its way up the chain--until it finds one that it trusts.
The administration server contains some default CA certificates. These certificates are self-signed. That is, each one vouches for itself. This is to provide a starting place to a certificate chain for clients that require it.
To install a CA's certificates, see the online Help.
What's in a certificate?
A certificate is a file that contains certain identifying information. The file is signed with the CA's private key to guarantee its authenticity and integrity. Netscape uses the industry-standard certificate type, known as x.509v3, which contains the following information:
- The holder's name, organization, address, and so on.
- The holder's public key.
- The certificate's validity dates.
- The certificate's serial number. The x.509v3 standard allows more detailed identifying information, such as what business the certificate-holder is in, and how long they've been in business. If you want to convey an extra sense of security to clients connecting to your server, consider purchasing a more detailed certificate.
On the client side of the transaction, though, be careful--these extra fields are not used in every certificate. Unless the server presents your client (browser) with a certificate using the extra identifying information, you can't always have complete confidence that server receiving your information is reliable. The best Internet security won't help you if you send your private information to a criminal. As with any certificate, whether or not you believe this information depends on whether or not you trust the CA.
It is important to understand that certificates don't prove conclusively that people or computers are who they claim to be. It merely proves that a CA has some degree of trust in the person. By exchanging information with a certificate holder, you trust the CA who issued the certificate. If you choose to purchase a certificate, buy it from a CA with a good reputation, or your investment might be wasted.
Choosing Certificate Authorities
Certain CAs are listed in the administration server can be trusted without having to install their root certificate. To trust any of these CAs, install a server certificate and then choose Keys & Certificates|Manage Certificates. Select the alias the server is using for encryption, and then click OK. The administration server lists the certificates you can automatically trust for the alias. You can trust different CAs for different aliases, and any server using the alias inherits the list of trusted CAs.
If a server sends Netscape Navigator or Netscape Communicator a certificate that uses an unknown CA, the browser displays a dialog box notifying the recipient that the certificate is from an untrusted certification authority. Users of Netscape Navigator 2.0 and later or Netscape Communicator can edit their list of trusted CAs. If you are purchasing your certificates from a third party, use a reputable CA.
A server administrator can also edit the list of CAs the server accepts (see the online Help on managing certificates for more information). You can add other CAs when you have decided to trust them. This becomes an increasingly important decision as more and more CAs appear. Just because a CA can purchase a program for issuing certificates doesn't mean you should trust that CA. You can use your server's error log file to view the names of the CAs belonging to people who tried to access your server but couldn't. You can then decide whether you want to add the CA to your list of trusted CAs.
Using client certificates
Some Netscape SuiteSpot servers support using client certificates to authenticate a user. There are two basic ways the server can use a client certificate:
- The server matches the CA in the client certificate with a trusted CA listed in the administration server. This simply ensures that the client has a valid certificate from a CA the server trusts. (If the client is Netscape Navigator or Netscape Communicator and the certificate is expired, the client warns the user before sending the out-of-date certificate. Most Netscape servers will log an error, reject the certificate, and return a message to the client.)
- The server gathers information from the client certificate and matches it with a user entry in an LDAP directory. This ensures that the client has a certificate and an entry in the LDAP directory. It can also ensure that the client certificate matches the one in the LDAP directory. Servers can use client certificates to ensure autheniticity when communicating with a client. They can also use the certificate to determine if a user has access to the server. For more information on how a specific server uses client certificates, read the documentation for that server.
A SuiteSpot server must have SSL turned on to use client certificates, and the administration server must trust the CA who issued the certificate to the client. For information on trusting CAs, see Managing server certificates.
Mapping client certificates to LDAP
This section describes the process some Netscape SuiteSpot 3.0 servers use to map a client certificate to an entry in an LDAP directory. When the server gets a request from a client, it asks for the client's certificate before proceeding. Netscape clients, such as Netscape Navigator and Netscape Communicator, send the client certificate to the server (with or without prompting the end user, depending on the browser's security configuration). The server takes the CA listed in the certificate and tries to match it to a trusted CA listed in the administration server. If there isn't a match, some servers end the connection and some perform a different operation based on the failed match. If there is a match, the server continues processing the request.
After the server checks that the certificate's CA is trusted, the server goes through three steps to map the certificate to an LDAP entry:
- It maps the subject (user's) DN to a branch point in the LDAP directory
- It searches the LDAP directory for entries that match the information
about the subject (end-user) of the client certificate
- It optionally verifies the client certificate with one in the LDAP
directory
The server uses a certificate mapping file called certmap.conf to determine how to do the LDAP search. The mapping file tells the server what values to take from the client certificate (such as the end-user's name, email address, and so on). The server uses these values to search for a user entry in the LDAP directory, but first the server needs to determine where in the LDAP directory it needs to start its search. The certificate mapping file also tells the server where to start.
Once the server knows where to start its search and what it needs to search for (step 1), it performs the search in the LDAP directory (step 2). If it finds more than one matching entry and the mapping is not set to verify the certificate, the search fails. Some servers end the transaction at this point.
When the server finds multiple matching entries in the directory, the server can optionally verify the client's certificate by comparing it with certificates for the matching entries in the LDAP directory. If the client certificate doesn't match any certificates in the matching entries or if the matching entries don't contain certificates, the certificate mapping fails. At this point, some servers end the transaction with the client; others perform an action based on the failed match. If none of the LDAP entries contain a certificate, the server also ends the transaction.
After the server finds a matching entry and certificate in the LDAP directory, it can use that information to process the transaction. For example, some servers use certificate-to-LDAP mapping to determine access to a server.
The following section describes the certmap.conf file. You need to edit this file to fit the entries in your LDAP directory and to match the certificates you expect your users to have.
Using the certmap.conf file
The certificate mapping file determines how a server should look up a user entry in the LDAP directory. You edit this file and add entries to match the organization of your LDAP directory and to list the certificates you want your users to have. Specifically, the mapping file defines:
- where in the LDAP tree the server should begin its search
- what certificate attributes the server should use as search criteria when searching for the entry in the LDAP directory
- whether or not the server goes through an additional verification process The certificate mapping file is located at <server_root>/userdb/certmap.conf. The file contains one or more named mappings, each applying to a different CA. A mapping has the following syntax:
certmap <name> <issuerDN>

<name>:<property> [<value>]
The first line specifies a name for the entry and the attributes that form the distinguished name found in the client certificate. The name is arbitrary; you can define it to be whatever you want. However, issuerDN must exactly match the issuer DN of the CA who issued the client certificate. For example, the following two issuerDN lines differ only in the spaces separating the attributes, but the server treats these two entries as different:
certmap moz1 ou=Mozilla Certificate Authority,o=Netscape,c=US

certmap moz2 ou=Mozilla Certificate Authority, o=Netscape, c=US
The second and subsequent lines in the named mapping match properties with values. The certmap.conf file has six default properties (you can use the certificate API to customize your own properties):
o=<org>, c=<country> entry in the LDAP directory, where <org> and <country> are replaced with values from the DN in the certificate.
- If there isn't a DNComps entry in the mapping, the server uses either the CmapLdapAttr setting or the entire subject DN in the client certificate (that is, the end-user's information).
- If the DNComps entry is present but has no value, the server searches the entire LDAP tree for entries matching the filter.
The attribute names for the filters need to be attribute names from the certificate, not from ones in the LDAP directory. For example, most certificates have an e attribute for the user's email address; whereas LDAP calls that attribute mail.
This approach to matching a certificate to an LDAP entry is useful when it's difficult to match entries using DNComps and FilterComps.
Creating custom properties
You can use the client certificate API to create your own properties. For information on programming and using the client certificate API, see your server's documentation or release notes.
Once you have a custom mapping, you reference the mapping as follows:
<name>:library <path_to_shared_library>

<name>:InitFn <name_of_init_function>
certmap default1 o=Netscape Communications, c=US

default1:library /usr/netscape/suitespot/userdb/plugin.so

default1:InitFn plugin_init_fn

default1:DNComps  ou o c

default1:FilterComps l

default1:verifycert on
Example mappings
The certmap.conf file should have at least one entry. The following examples illustrate the different ways you can use the certmap.conf file.
Example #1
Here is a simple certmap.conf file with only one "default" mapping:
certmap default default

default:DNComps ou, o, c

default:FilterComps e, uid

default:verifycert on
Using this example, the server starts its search at the LDAP branch point containing the entry ou=<orgunit>, o=<org>, c=<country> where the text in <> is replaced with the values from the subject's DN in the client certificate.
The server then uses the values for email address and userid from the certificate to search for a match in the LDAP directory. When it finds an entry, the server will verify the certificate by comparing the one the client sent to the one stored in the directory.
Example #2
certmap default default

default:DNComps

default:FilterComps e, uid
certmap usps ou=United States Postal Service, o=usps, c=US

usps:DNComps ou,o,c

usps:FilterComps e

usps:verifycert on
This file has two mappings: a default one and another for the US Postal Service. When the server gets a certificate from anyone other than the US Postal Service, it uses the default mapping, which starts at the top of the LDAP tree and searches for an entry matching the client's email and userid. If the certificate is from the US Postal Service, the server starts its search at the LDAP branch containing the organizational unit and searches for matching email addresses. Also note that if the certificate is from the USPS, the server verifies the certificate; other certificates are not verified.
The issuer DN (that is, the CA's information) in the certificate must be idenitical to the issuer DN listed in the first line of the mapping. In the previous example, a certificate from an issuer DN that is o=United States Postal Service,c=US won't match because there isn't a space between the o and the c attributes.
Example #3
This example uses the CmapLdapAttr property to search the LDAP database for an attribute called certSubjectDN whose value exactly matches the entire subject DN taken from the client certificate.
certmap myco ou=My Company Inc, o=myco, c=US

myco:CmapLdapAttr certSubjectDN

myco:DNComps  o, c

myco:FilterComps mail, uid

myco:verifycert on
If the client certificate subject is
uid=Henry Jones Junior, o=Ark Inc, c=US
the server first searches for entries that have:
certSubjectDN=uid=Henry Jones Junior, o=Ark Inc, c=US
If one or more matching entries are found, the
server proceeds to verify the entries. If no matching entries are found,
the server will use DNComps and FilterComps to search
for matching entries. In this example, the server would search for uid=Henry
Jones Junior in all entries under
o=Ark Inc, c=US.
This example assumes the LDAP directory contains entries with the attribute certSubjectDN.
Putting all the pieces together: SSL
Now that you have learned about the various technologies that provide confidentiality, integrity, and authentication, you'll see how all the pieces fit together to create the Secure Sockets Layer protocol. Later in this chapter, you'll learn the steps to take to create your server's public and private keys, and how to request and install a certificate.
Essentially, SSL is symmetric encryption nested within public-key encryption, authenticated through the use of certificates. An SSL connection can occur only between an SSL-enabled client and an SSL-enabled server. In fact, when a server is running in SSL mode, it can communicate only through SSL.
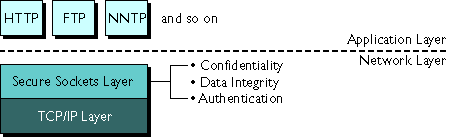
TCP/IP is Transmission Control Protocol/ Internet Protocol, the basic language of the Internet, and HTTP is Hypertext Transfer Protocol, the basic language of the graphical World Wide Web, a subset of the Internet.
Technically speaking, SSL is a protocol that runs above TCP/IP and below HTTP, NNTP, or other top-level protocols, as shown in Figure 5.2.
How SSL relates to TCP/IP and application protocols.
An SSL connection is initiated by a network browser when it asks a server to send a document through HTTPS, LDAPS, SNEWS, or other secure protocol.
Here are the general steps of SSL-encrypted communication:
- The client sends a request to connect to the secure server.
- The server sends its presigned certificate to the client. This, and
the first step, are collectively known as the handshake.
- The client checks whether the certificate was issued by a CA it trusts.
If so, it proceeds to the next step. Otherwise, the client can cancel the
connection or proceed. Netscape Navigator and Netscape Communicator display
a warning message saying the certificate isn't trusted and then asks the
user if they want to proceed or not.
- The client compares the information in the certificate with the information
it just received concerning the site: its domain name and its public key.
If the information matches, the client accepts the site as authenticated.
- The client tells the server what ciphers, or types of encryption keys,
it can communicate with.
- The server chooses the strongest common cipher and informs the client.
- Using that cipher, the client generates a session key (a symmetric
encryption key used only for this transaction) and encrypts it using the
server's public key.
- The client encrypts the session key using the server's public key,
then it sends the encrypted session key to the server.
- The server receives the encrypted session key and decrypts it using
its private key.
- The client and the server use the session key to encrypt and decrypt
the data they send to each other.
Increasing server security
There are other security risks besides someone trying to break your encryption. The modern network faces risk from external and internal hackers, using a variety of tactics to gain access to your server and the information on it.
So in addition to enabling SSL on your server, you should take extra security precautions. For example, put the server machine into a secure room, and don't allow untrusted individuals to upload programs to your server.
When considering how much extra security to implement, keep in mind that the strongest encryption in the world does you no good if someone can get to your data some other way. The following sections describe the most important things you can do to make your server more secure.
Limit physical access
This simple security measure is often forgotten. Keep the server machine in a locked room that only authorized people can enter. This prevents anyone from hacking the server machine itself.
Also, protect your machine's administrative (root) password, if you have one.
Limit administration access
If you use remote configuration, be sure to use access control to allow administration from only a few users and computers. If you want your administration server to provide end-user access to the LDAP server or local directory information, consider maintaining two administration servers and using cluster management so that the SSL-enabled administration server acts as the master server and the other administration server is available for end-users' access.
You should also turn on encryption for the administration server. If you don't use an SSL connection for administration, then you should be cautious when performing remote server administration over an unsecure network. Anyone could intercept your administrative password and reconfigure your servers.
Choose good passwords
You use a number of passwords with your server--the administrative password, the private key password, database passwords, and so on. Your administrative password is the most important password of all, since anyone with that password can configure any and all servers on your computer. Most important after that is your private key password. If someone gets your private key and your private key password, they can create a fake server that appears to be yours, or intercept and change communications to and from your server.
For these reasons, it's important that you choose passwords that are difficult to guess and that you never reveal them to anyone. Your most important passwords should not contain words from any language because numerous password-cracking programs exist that can run through millions of possible word combinations in seconds. Your important passwords also should be at least eight characters long, and contain a mix of upper and lowercase letters, punctuation marks, or mathematical characters, and numerals.
A good password is one you'll remember but others won't guess. For example, you could remember MBi12!mo as "My Baby is 12 months old!" A bad password is your child's name or birthdate.
It's not a good idea to write your passwords anywhere, but if you feel you must, store them in a safe place, perhaps in a safe or other locked box.
Secure your key-pair file
Make sure your key-pair file is protected. The administration server stores key-pair files in the directory <server_root>/alias. Consider making the files and directory readable only to SuiteSpot servers installed on your computer. It's also important to know if the file is stored on backup tapes or is otherwise available for someone to intercept. If so, you must protect your backups as completely as your server.
Limit other applications on the server
Carefully consider all applications that run on the same machine as the server. It's possible to circumvent your server's security by exploiting holes in other programs running on your server. Disable all unnecessary programs and services. For example, the Unix sendmail daemon is difficult to configure securely and it can be programmed to run other possibly detrimental programs on the server machine.
Unix
Carefully choose the processes started from inittab and rc scripts. Don't run telnet or rlogin from the server machine. You also shouldn't have rdist on the server machine (this can distribute files but it can also be used to update files on the server machine).
NT
Carefully consider which drives and directories you share with other machines. Also, consider which users have accounts or Guest privileges.
Similarly, be careful about what programs you put on your server or allow other people to install on your server. Other people's programs might have security holes. Worst of all, someone might upload a malicious program designed specifically to subvert your security. Always examine programs carefully before you allow them on your server.
Limit ports
Disable any ports not used on the machine. Use routers or firewall configurations to prevent incoming connections to anything other than the absolute minimum set of ports. This means that the only way to get a shell on the machine is to physically use the server's machine, which should be in a restricted area already.
Know your server's limits
The server offers secure connections between the server and the client. It can't control the security of information once the client has it, nor can it control access to the server machine itself and its directories and files.
Being aware of these limitations helps you know what situations to avoid. For example, you might acquire credit card numbers over an SSL connection, but are those numbers stored in a secure file on the server machine? What happens to those numbers after the SSL connection is terminated? You should be responsible for securing any information clients send to you through SSL.
Enabling SSL encryption
To enable SSL on your server, you must complete these steps:
- Generate your server's key-pair file
(public and private keys).
- Request a certificate from a Certification
Authority (CA).
- Install the certificate the CA sends
to you.
- Turn on SSL encryption for your server.
What is an alias?
An alias is a name associated with both a key-pair file and a certificate file. You use the alias to refer to these files when setting up SSL encryption on a server.
You specify an alias when you generate the key-pair file. The key-pair file is then used when requesting a certificate. Both the key-pair file and the certificate file use the alias as part of their file name. For example, if you generate a key with an alias named mail, the key-pair and certificate files will be named mail-key.db and mail-cert.db.
If you have a key-pair file and certificate from a 2.x server, you can convert them for use with the 3.x administration server.
Creating an alias
The administration server automatically creates an alias when you generate a key-pair file. However, you might want to create multiple aliases that point to mutliple copies of the key-pair and certificate files. If you have a 2.x key-pair file and certificate file, you need to convert them to 3.x.
To create an alias for an existing key-pair file and certificate file:
- In the administration server, choose Keys & Certificates|Create
Alias.
- In the form that appears, type an alias name. This name becomes part
of the new file names for the key-pair and certificate files. For example,
if you generate a key with an alias named mail, the key-pair and
certificate files will be named mail-key.db and mail-cert.db.
- Type the absolute paths and file names to the key-pair and certificate
files, and then click OK to create the alias.
You can use these steps to create an alias for an existing key-pair file only. You can then install the certificate at a later time. To do this, omit the certificate file information in the form.
Removing an alias
When you remove an alias, the server deletes the key-pair and certificate files associated with that alias.
- In the Server Administration page, choose Keys & Certificates|Remove
Alias.
- In the form that appears, select the alias you want to remove, and
then make sure the Yes option is checked.
- Click OK to remove the alias and delete the key-pair and certificate
files from your hard disk. You'll get a prompt asking you to confirm the
deletion. Click OK. This procedure cannot be undone!
Listing aliases
You can view the aliases you have installed in the administration server by clicking the List Alias link in the Keys & Certificates section of the Server Administration page.
The List Aliases form shows all aliases and the key-pair and certificate files associated with the alias. All aliases and their key-pair and certificate files are stored in the directory <server_root>/alias. The Refresh button reads the entries in this directory; you can use this button if you've made changes to your aliases and you want to view the most up-to-date information stored on your disk. You only need to use this button if your browser has cached copy of the form data and you recently made changes to the information.
Generating a key-pair file
A key-pair file contains both the public and private keys used for SSL encryption. You use the key-pair file when you request and install a certificate. The key-pair file is stored encrypted in the directory <server_root>/alias/<alias>-key.db. When you create the key, you specify a password that you later use when you start a server that is using encrypted communications.
Generating a key-pair file on Unix platforms
- Log in as root and change to the server root directory.
- Run the key-pair file generation program by changing to the directory
bin/admin/admin/bin and typing ./sec-key.
- When prompted, type an alias for the new key-pair file. You might choose
an alias that matches your server (for example, web or mail).
The alias cannot contain spaces, but it can use symbols that your operating
system allows in filenames (such as underscores). By default, the key-pair
file is stored in <server_root>/alias/<alias>-key.db,
where <alias> is the alias you typed. If you used the alias
mail, your key-pair file would be <server_root>/alias/mail-key.db.
- A screen with a progress meter appears. Type any random keys at different
speeds until the progress meter is full. The time between each of your
keystrokes will be used to generate a random number for the unique key-pair
file.
- When prompted, type a password of eight characters or more for your
key-pair file. The password must have at least one non-alphabetical character
(a number or punctuation mark). Make sure you memorize this password. The
security of your server is only as good as the security of the key-pair
file and its password.
After you enable SSL for a server (either the administration server or another Netscape server), you must type the key-pair file password when you start the server. - Retype the password and click OK. The file is created and stored.
- Return to the Server Manager forms and request
a certificate. After you receive and install the certificate, you can
turn on encryption.
Generating a key-pair file on Windows NT platforms
From the Windows NT command prompt:
- Go to the <server root>/bin/admin/admin/bin
directory.
- Run the sec-key.exe application. The key-pair file generation
program appears.
- When prompted, type an alias for the new key-pair file. You might choose
an alias that matches your server (for example, web or mail).
The alias cannot contain spaces, but it can use symbols that your operating
system allows in filenames (such as hyphens and underscores). By default,
the key-pair file is stored in the directory
C:/<server_root>/alias/<alias>-key.db
where <alias> is the alias you typed. If you used the alias mail, your key-pair file would be C;/<server_root>/alias/mail-key.db.
- A screen with a progress meter appears. Move your mouse in random motions
at random speeds. These random movements are used to generate a random
number for the unique key-pair file.
- When prompted, type a password of eight characters or more for your
key-pair file. The password must have at least one non-alphabetical character
(a number or punctuation mark). Make sure you memorize this password. The
security of your server is only as good as the security of the key-pair
file and its password.
After you turn on SSL for a server (either the administration server or another Netscape server), you must type the key-pair file password when you start the server. - Retype the password and click OK. The file is created and stored.
- Return to the Server Manager forms and request
a certificate. After you receive and install the certificate, you can
turn on encryption.
Changing your key-pair file password
You should periodically change your key-pair file password. If you forget your password, you will have to regenerate your key-pair file, which means you must also obtain another certificate (there are usually additional costs to do this).
Don't change your key file password if you are administering your server over a non-SSL connection. Anyone can intercept the information and activate or disable your SSL.
To change your key-pair file password:
- In the Server Administration page, choose Keys & Certificates|Change
Key Password.
- From the drop-down list, select the alias for the key-pair file.
- Type the old password in the Old password field.
- Type the new password in the New Password field.
- Retype the new password in the Password (Again) field.
- Click OK.
Requesting a certificate
After you generate a key-pair file, you can request a certificate from a Certification Authority (CA). For information on what a certificate is, refer to Authentication and certificates.
If your company has its own internal CA for issuing certificates, you should request your certificate from them. If you plan to purchase your certificate from a commercial CA, choose a CA and ask for the specific format of the information they require. (For more information on what some CAs require, see Information CAs need.)
Not everyone who requests a certificate from a commercial CA is given one. Many CAs require you to prove your identity before issuing you a certificate. Also, it can take anywhere from a day to two months or more to approve a certificate. You are responsible for promptly providing all the necessary information to the CA.
To request a certificate, make sure you know what information your CA requires, and then follow these steps:
- In the Server Administration page, choose Keys & Certificates|Request
Certificate.
- In the form that appears, specify if this is a new certificate or a
renewal. Many certificates expire after a set period of time, such as six
months or a year. Some CAs will automatically send you a renewal.
- Specify how you want to submit the request for the certificate.
- If the CA expects to receive the request in an email message, check CA Email and enter the email address of the CA.
- If you are requesting the certificate from an internal CA that is using
Netscape Certificate Server, click CA URL and enter the URL for
the Certificate Server. This URL should point to the certificate server's
program that handles certificate requests. A sample URL might be
https://CA.mozilla.com:444/cms.
- From the drop-down list, select the alias for the key-pair file you
want to use when requesting the certificate.
- Type the password for your key-pair file. The server uses the password
to get your private key and encrypt a message to the CA. The server then
sends both your public key and the encrypted message to the CA.
The CA uses the public key to decrypt your message.
- Type your identification information. The format of this information
varies by CA. For a general description of these fields, see Information
CAs need. Most of this information usually isn't required for a renewal.
- Double-check your work to ensure accuracy. The more accurate the information,
the faster your certificate is likely to be approved.
- Click OK when the information is correct. If your request is going
to a certificate server, you'll be prompted to verify the form information
before the request is submitted. You should re-read the information and
then click OK to submit the request to the certificate server.
The server generates a certificate request that contains your information. The request has a digital signature created with your private key. The CA uses a digital signature to verify that the request wasn't tampered with during routing from your server machine to the CA. In the rare event that the request is tampered with, the CA will usually contact you by phone.
If you chose to email the request, the server composes an email message containing the request and sends the message to the CA. Typically, the certificate is sent to you via email. If instead you specified a URL to a certificate server, your server uses the URL to submit the request to the Certificate Server. You might get a response via email or other means depending on the CA.
If the CA agrees to issue you a certificate, the CA will notify you. (In most cases, the CA will send your certificate via email. If your organization is using a certificate server, you may be able to search for the certificate by using the certificate server's forms.)
Once you receive the certificate, you can install it. In the meantime, you can still use your server without SSL.
Information CAs need
Whether you are requesting a certificate from a commercial CA or an internal CA, you need to provide the following information:
- Common Name is usually the fully qualified hostname used in DNS lookups (for example, www.netscape.com). This is the hostname in the URL that a browser uses to connect to your site. It's important that these two names are the same, otherwise a client is notified that the certificate name doesn't match the site name, which will make people doubt the authenticity of your certificate. However, some CAs might require different information, so it's important to contact them.
- Email Address is your business email address. This is used for correspondence between you and the CA.
- Organization is the official, legal name of your company, educational institution, partnership, and so on. Most CAs require that you verify this information with legal documents (such as a copy of a business license).
- Organizational Unit is an optional field that describes an organization within your company. This can also be used to note a less formal company name (without the Inc., Corp., and so on).
- Locality is an optional field that usually describes the city, principality, or country for the organization.
- State or Province is usually required, but can be optional for some CAs. Most CAs won't accept abbreviations, but check with them to be sure.
- Country is a required, two-character abbreviation of your country name (in ISO format). The country code for the United States is US. In the certificate file, all the fields together are called the distinguished name. The distinguished name in a certificate aids in uniquely identifying certificates to programs that need to.
If you are purchasing your certificate from a commercial CA, you must contact the CA to find out what additional information they require before they issue a certificate. Most CAs require that you prove your identity. For example, they want to verify your company name and who is authorized by the company to administer the server, and they might ask whether you have the legal right to use the information you provide.
Some commercial CAs offer certificates that indicate a greater level of detail and veracity to vendors or individuals who provide greater proof of their identity. For example, you might be able to purchase a certificate stating that the CA has not only verified that you are the rightful administrator of the www.mozilla.com computer, but that you really are a company that has been in business for ten years and have no outstanding customer litigation against you. Generally, these certificates cost more than standard ones.
Installing the certificate
There are two types of certificates that you can install:
- Your own certificate to present to clients.
- A CA's own certificate for use in a certificate chain. Each of these certificates is installed through the process described here.
When you receive a certificate from the CA, it will be encrypted with your public key so that only you can decrypt it. The server will use the key-pair file password you specify to decrypt the certificate when you install it. You can either save the email somewhere accessible to the server, or copy the text of the email and be ready to paste the text into the Install Certificate form, as described here.
CAs' certificates for use in a certificate chain are installed using the same process as installing your own certificate. If your CA doesn't automatically send you their certificate, you should request it. However, many CAs include their certificate in the same email that contains your certificate. In this case, your server installs both certificates at the same time when you install your certificate. For more information on certificate chaining, see Chaining certificates.
To install a certificate and associate it with an alias:
- In the Server Administration page, choose Keys & Certificates|Install
Certificate.
- Check the type of certificate you are installing:
- This Server is for a single certificate associated only with your server.
- Server Certificate Chain is for a CA's certificate to include in a certificate chain.
- Trusted Certificate Authority (CA) is for a certificate of a CA that you want to accept as a trusted CA for client authentication.
- If the certificate is for a chain, name the certificate. This name
will appear in the Manage Certificates list. The name should be descriptive
and can include spaces. For example, "United States Postal Service
CA" is the name of the CA, and "VeriSign Class 2 Primary CA"
describes both the CA and the type of certificate. If the certificate is
for "this server," the administration server uses the name Server-Cert.
- Either type the full pathname to the saved email or paste the email
text in the field called Message text. If you copy and paste the text,
be sure to include the headers "Begin Certificate" and "End
Certificate." Make sure you check the corresponding radio button for
either the file or the text.
- From the drop-down list, select the alias you used when you requested
the certificate. If you choose the incorrect alias, the certificate won't
install.
- Click OK. Another form appears asking if you want to add the certificate.
Click the Add button. The certificate is stored in the directory <server_root>/alias.
The filename will be <alias>-cert.db. For example, if your
alias is mail, the file will be mail-cert.db.
If you have just installed your own certificate, you can now activate SSL for your server.
Managing server certificates
You can view, delete, or edit the trust settings of all the certificates installed on your server. This includes your own certificate and certificates from CAs.
To manage this list of certificates:
- In the Server Administration page, choose Keys & Certificates|Manage
Certificates. The Manage Server Certificates form appears.
- Select a certificate file alias from the drop-down list, and then click
OK. All of the installed certificates associated with the alias appear
with their type and expiration date. The link text is the name given to
the certificate when it was installed. The administration server comes
with several default certificates, which are listed above the certificates
you installed. all certificates are stored in the directory <server_root>/alias.
- To view more information about a certificate, click the link for the
certificate. A window appears, containing information about that certificate.
Figure 5.3 shows a sample.
Certificate information includes the owner and who issued it.
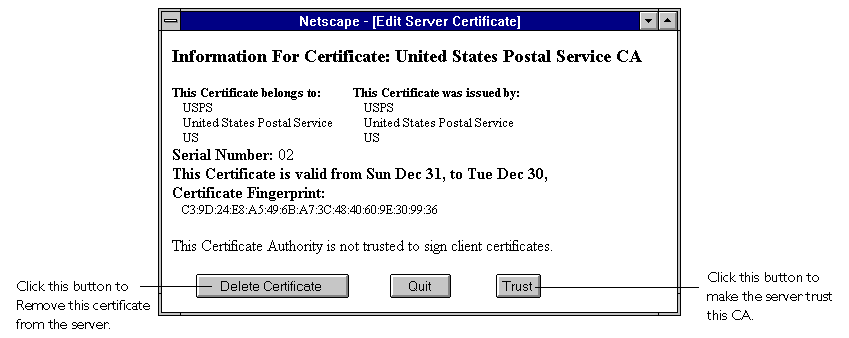
- To trust the CA, click Trust. If the CA is already trusted, you can
click Do Not Trust. By default, all CAs are not trusted. To delete the
certificate, click the Delete Certificate button. To close the window,
click the Quit button.
Converting 2x certificate databases
If you have key files and certificates for your 2.x servers, you can convert them for use with a 3.x administration server (and 3.0 SuiteSpot servers).
- In the Server Administration page, choose Keys & Certificates|Convert
2.0 Certdb.
- In the form that appears type the following information:
- Alias is the name you want to associate with the key-pair and certificate.
- Key-pair File is the absolute path and name to the 2.0 key file. With
2.x servers, this file is stored in a configuration directory that uses
the server name and ID. For example,
<server_root>/https-www/config/ServerKey.db. - Certificate File is the absolute path to the 2.0 certificate file. The 2.x file name is called ServerCert.db.
- Click OK to convert the files. The administration server copies the
original key-pair file and certificate file to the directory <server_root>/alias
and names the files with the alias you specified. For example, if you specified
an alias named mail, the key-pair and certificate files will be
named mail-key.db and mail-cert.db.
The converted files appear in the directory <server_root>/alias. The original files remain unchanged.
Activating SSL encryption
After you have generated a key-pair file and installed your certificate, you can activate SSL for your administration server. See the documentation for individual servers if you want to enable encryption in them.
- In the Server Manager, choose Admin Preferences|Encryption On/Off.
The Encryption On/Off form appears.
- Check the On radio button.
- In the drop-down list, choose the alias for the key-pair file and certificate
file that you want to use. You must know the password for the key-pair
file referenced by this alias--it's the password you must enter before
starting or stopping a server that uses SSL encryption.
- Set any security preferences you
want.
- Stop your server, and then start it from
the command-line or NT control panel. You'll be prompted to enter the password
for the key-pair alias you used.
URLs to an SSL-enabled administration server are constructed using https instead of simply http. URLs that point to documents on an SSL-enabled server have this format:
https://<servername.[domain.[dom]]:[port#]>
For example, https://admin.mozilla.com:443. If you use the default secure http port number (443), you don't have to use the port number in the URL.
Setting security (SSL) preferences
You can set preferences for using SSL encryption on the administration server.
- Go to the Server Manager and choose Admin Preferences|Encryption Preferences.
- Check the SSL versions you want your server to communicate with. The
latest and most secure version is SSL version 3, but many older clients
use only SSL version 2. You will probably want to enable your server to
use both versions.
- Check the ciphers you want your
server to use. The ciphers are listed for each version of SSL. A cipher
is the algorithm used in encryption. Some ciphers are more secure, or stronger,
than others. Generally speaking, the more bits a cipher uses during encryption,
the harder it is to decrypt the data. Ciphers are described after this
list.
- Click OK. Make sure you restart your server.
When a navigator initiates an SSL connection with a server, it lets the server know what ciphers it prefers to use to encrypt information. In any two-way encryption process, both parties must use the same ciphers. Since there are a number of ciphers available, you should consider enabling all ciphers.
You can choose ciphers from both the SSL 2 and SSL 3 protocols. Unless you have a compelling reason why you don't want to use a specific cipher, you should check them all.
You might not want to check No Encryption, only MD5 message authentication, because if no other ciphers are available in the navigator, the server will use this protocol, and no encryption will occur. That is, by checking this option, you allow your server to communicate without SSL encryption.
Another reason you might not want to enable all ciphers is to prevent SSL connections with less than optimal encryption. That is, United States law prohibits the export of products with more than 40-bit encryption, so some clients might only be using 40-bit encryption, which is not as difficult to decipher as 128-bit. Unchecking all 40-bit ciphers effectively restricts access to network browsers available only in the United States. All ciphers that the administration server supports are listed here for your reference.
- RC4 cipher with 128-bit encryption and MD5 message authentication. RC4 ciphers are the fastest ciphers. This cipher, because it has 128-bit encryption, is the second strongest cipher next to Triple DES (Data Encryption Standard) with 168-bit encryption. It has approximately 3.4 * 1038 possible keys, making it very difficult to crack. As added security, all SSL 2.0 ciphers use MD5 (Message Digest 5) message authentication. MD5 message authentication detects attempts to modify data while it is in transit.
- RC4 cipher with 40-bit encryption and MD5 message authentication. This cipher is also an RC4 cipher, making it one of the fastest available ciphers, and it is the strongest encryption that Netscape Communications is permitted to export under U.S. law. It has 40-bit encryption. 40-bit encryption has approximately 1.1 * 1012 (a trillion) possible keys, making it easier to crack than 128-bit encryption. This cipher also uses MD5 message authentication to detect attempts to modify data in transit.
- RC2 cipher with 128-bit encryption and MD5 message authentication. The RC2 ciphers are slower than the RC4 ciphers. This RC2 cipher, because it has 128-bit encryption, is the second strongest cipher next to Triple DES with 168-bit. It has approximately 3.4 * 1038 possible keys, making it very difficult to crack. This cipher also uses MD5 message authentication to detect attempts to modify data in transit.
- RC2 cipher with 40-bit encryption and MD5 message authentication. This cipher is also an RC2 cipher, making it is slower than the RC4 cipher. 40-bit encryption is not as strong as 128-bit encryption, and has approximately 1.1 * 1012 (a trillion) possible keys. This cipher also uses MD5 message authentication to detect attempts to modify data in transit.
- DES with 56-bit encryption and MD5 message authentication. DES (Data Encryption Standard) is a U.S. government standard for data encryption. This cipher does not have as many possible keys as does 128-bit encryption, and therefore is not as strong. 56-bit encryption has approximately 7.2 * 1016 possible keys. This cipher also uses MD5 message authentication to detect attempts to modify data in transit.
- Triple DES with 168-bit encryption and MD5 message authentication. Triple DES is the strongest cipher available, but it is not as fast as RC4. Triple DES uses a key three times as long as the key for standard DES. Because the key size is so large, there are more possible keys than for any other cipher - approximately 3.7 * 1050. This cipher also uses MD5 message authentication to detect attempts to modify data in transit. The SSL 3.0 ciphers are:
- RC4 with 128-bit encryption and MD5 message authentication. This cipher is the same as the SSL 2.0 version of RC4 with 128-bit encryption but uses a more secure implementation of MD5 message authentication to detect attempts to modify data in transit.
- RC4 with 40-bit encryption and MD5 message authentication. This cipher is the same as the SSL 2.0 version of RC4 with 40-bit encryption but uses a more secure implementation of MD5 message authentication to detect attempts to modify data in transit, and it is the strongest encryption that Netscape Communications is permitted to export under U.S. law.
- Triple DES with 168-bit encryption and SHA message authentication. This cipher is the same as the SSL 2.0 version of Triple DES with 168-bit encryption, but uses SHA (Secure Hash Algorithm) message authentication instead of MD5 message authentication. SHA is a government standardized algorithm that is used to construct a message authentication code that detects attempts to modify data while it is in transit. SHA is slower than MD5, but it is stronger.
- DES with 56-bit encryption and SHA message authentication. This cipher is the same as the SSL 2.0 version of DES with 56-bit encryption but uses SHA message authentication instead of MD5 message authentication. It has 40-bit encryption, which is the strongest encryption that Netscape Communications is permitted to export under U.S. law.
- RC2 with 40-bit encryption and MD5 message authentication. This cipher is the same as the SSL 2.0 version of RC2 with 40-bit encryption but uses a more secure implementation of MD5 message authentication to detect attempts to modify data in transit. It is the strongest encryption that Netscape Communications is permitted to export under U.S. law
- No encryption, only MD5 message authentication. This cipher uses only MD5 message authentication to secure data. Any data sent using this cipher is not encrypted. The data may be protected from modification, but it can be viewed by eavesdroppers.
Changes to the ns-admin.conf file
With an SSL-enabled server installed, there are several changes to the file <server_root>/admin-serv/config/ns-admin.conf (the administration server's configuration file). These new directives are briefly described in the following sections.
Security
The Security directive tells the server whether SSL is enabled or disabled.
Syntax
Security [on|off]
value is on when SSL is enabled, or off when disabled.
SSL2
The SSL2 directive tells the server that SSL2 is enabled or disabled.
Syntax
SSL2 [on|off]
value is on when SSL2 is enabled, or off when disabled.
SSL3
The SSL3 directive tells the server that SSL3 is enabled or disabled.
Syntax
SSL3 [on|off]
on when SSL3 is enabled, or off when disabled.
Keyfile
The Keyfile directive tells the server where the key file is located.
Syntax
Keyfile <alias>-key.db
<alias>-key.db is the server's key-pair file, specified as an absolute path.
Certfile
The Certfile directive specifies where the certificate file is located.
Syntax
Certfile <alias>-cert.db
<alias>-cert.db is the server's certificate file, specified as an absolute path.
Ciphers
The Ciphers directive specifies the ciphers enabled for your server. For a discussion of these ciphers, refer to Setting security (SSL) preferences.
Syntax
Ciphers +rc4 +rc4export -rc2 -rc2export +idea +des +desede3
A + means the cipher is active, and a - means the cipher is inactive. Any cipher with export as part of its name is not stronger than 40 bits.
SSL3Ciphers
The SSL3Ciphers directive specifies the SSL 3 ciphers enabled for your server.
Syntax
SSL3Ciphers +rsa_rc4_128_md5 +rsa_3des_sha +rsa_des_sha +rsa_rc4_40_md5 +rsa_rc2_40_md5 -rsa_null_md5
A + means the cipher is active, and a - means the cipher is inactive. Any cipher with 40 as part of its name is 40 bits.
Copyright 1997 Netscape Communications Corporation. All rights reserved.