Customizing the BeOS
6
Several applications included with the BeOS allow you to customize the look and operation of your computer. This chapter shows you how to use each of these applications in the BeOS Preview Release, and how to add fonts, drivers, and system add-ons.
This chapter discusses the following topics:
Using the Boot Application
The Boot application is useful only if you have the BeOS installed on more than one disk connected to your computer. It lets you select the default SCSI or IDE device from which to launch the BeOS.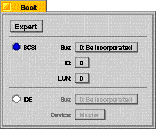
Using Drive Setup
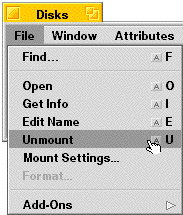
You can mount and unmount volumes directly from the Tracker's Disks window's File menu. Mounting makes the contents of a disk available to the operating system; unmounting does the reverse. You should always unmount floppies and other removable media before ejecting them.
WARNING: Use of the Drive Setup application can result in the loss of your data. Be careful using Drive setup and back up your data before proceeding.
Disk Mounting Settings
The Tracker's Disks window's File menu also contains the Mount Settings dialog, which controls automatic mounting of disks and removable media, and lets you choose the disks you want to mount during the boot process.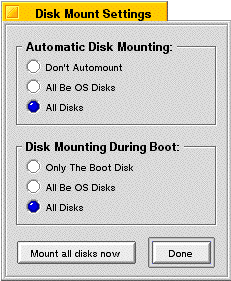
Automatic Disk Mounting
Automatic Disk Mounting controls the mounting of disks inserted or attached after the machine has booted. It offers the following three options:
- You can choose not to automatically mount any volume,
- You can automatically mount only BeOS disks,
- You can automatically mount all disks.
Disk Mounting During Boot
Disk mounting during boot controls the mounting of disks during the boot process. There are three options available:
- You can choose to mount only the boot disk.
- You can mount all BeOS disks or volumes,
- You can mount any recognized disks or volumes.
Supported Drives
The Drive Setup application lets you work with any type of drive supported by the BeOS. In Drive Setup you can mount, unmount, format, partition, eject, and initialize disks connected to your computer.Some important terms to remember:
- A disk drive is a physical device; e.g., a SCSI hard drive.
- You can partition a disk into multiple volumes.
- A volume is a logical device. A single hard drive can have multiple logical volumes; e.g., one for the Mac OS and one for the BeOS.
Drive Setup Features
If you want to mount, unmount, format, partition, eject, or initialize disks connected to your computer, launch the Drive Setup application.

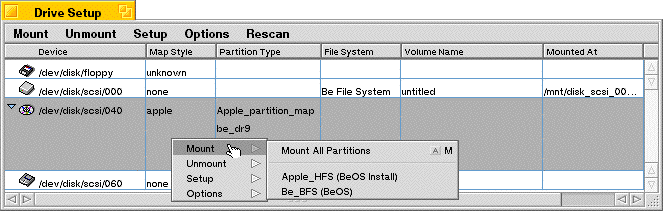
The Drive Setup application window shows you the drives currently installed in the system. In the window above you see there are four drives connected to the computer: a floppy drive, a hard drive, a CD-ROM, and a removable SCSI device. A small triangle appears next to partitioned drives with multiple volumes. Click on the triangle to see all of the volumes on the drive.
The table below identifies and describes the features of the Drive Setup application window:
Mounting a Volume
Mounting simply means displaying a drive or volume in the Disks folder located on the Desktop. You can mount a drive or volume either via the Disks window's File menu or with Drive Setup.
- Launch Drive Setup.
- Select the device you want to mount: e.g., floppy, CD, Zip drive, etc.
- Select the Mount menu. You can also use the context-sensitive menus (click the right mouse button or press the Control-Command keys while clicking the mouse) to see the Mount menu as shown below:
Unmounting a Volume
Unmounting means removing a drive or volume from the Disks folder display. To unmount a volume:
- Launch Drive Setup.
- Select the device you want to unmount:e.g., floppy, CD, Zip drive, etc.
- Select the Unmount menu.
Formatting a Disk
Formatting is a time consuming, low-level process. You should attempt to format a disk only after initialization has failed.
WARNING: Formatting a disk destroys all data on that disk! Back up any data on you want to keep before formatting the disk.
To format a disk:
- Launch Drive Setup.
- Select the disk you want to format, and unmount it if necessary.
- Select Format from the Setup menu.
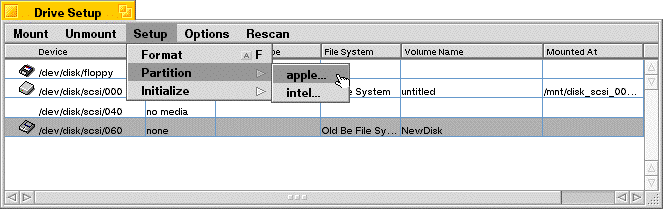
Partitioning a Disk
You can use Drive Setup to create multiple partitions on a disk, except on floppy disks, which are too small to partition, and on read-only media like CD-ROMs. You might want to create a partition to allocate half of your hard drive to the BeOS and half to the MacOS.
WARNING: Partitioning a disk destroys all data on a disk! Back up data you want to keep before partitioning the disk.
To create a partition:
- Launch Drive Setup.
- Select the disk you want to initialize, and unmount it if necessary.
- Select Partition from the Setup menu.
Creating Apple-Style Partitions
When you choose an Apple-style partition you have the option to enter each partition by hand or use one of the preset layout configurations.
You can choose one of the configurations in the Layout pop-up. You can alter the preset configurations by clicking on one of the preset partitions and then changing the name, type, or size.
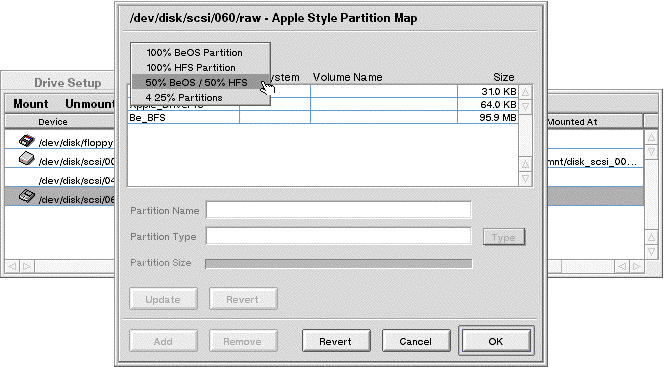
To change the partition name or type enter the appropriate information in the corresponding text box.
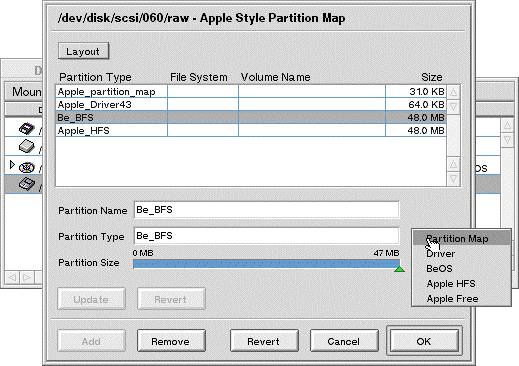
To change the partition size move the slider left to increase or right to decrease the size. If you change the size, you should click update to see the new sizes of all of the partitions.
WARNING: Use only one of the partition types in the pop-up menu or your partition will not be recognized by the BeOS or MacOS.
You can also add or remove partitions with the Add and Remove buttons at the bottom of the window.
When you have the configured the partitions, click OK to partition the drive. A dialog warns that you may lose all the data on your disk; continue only if you are sure you want to erase all of the data on the disk.
Creating Intel-Style Partitions
When you choose an Intel-style partition you can have up to four partitions per disk.You can choose one of the preset configurations by clicking the Layout pop-up menu. You can alter the type and size of the partitions. Drive Setup supports six different Intel partitions types via the pop-up menu next to the Type field. You typically use DOS Large or BeOS.
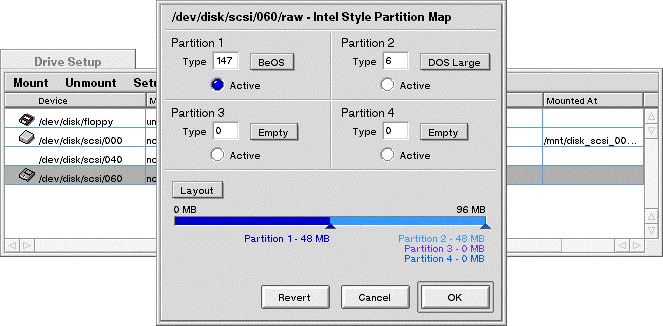
To change the partition name or type enter the appropriate information in the corresponding text box.
To change the partition size move the slider left to increase or right to decrease the size. If you change the size, you should click update to see the new sizes of all the partitions.
WARNING: Use only one of the partition types in the pop-up menu or your partition will not be recognized by the BeOS or by Intel-based operating systems such as Windows.
You can also add or remove partitions with the Add and Remove buttons at the bottom of the window.
When you have the configured the partitions, click OK to partition the drive. A dialog warns that you may lose all the data on your disk; continue only if you are sure you want to erase all of the data on the disk.
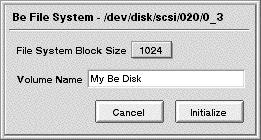
Initializing a Disk
Initializing a disk prepares it to hold data in a certain file system format; e.g., Mac HFS, DOS, BeOS. You must initialize a new Be partition before you can write data to it.To initialize your disk:
- Launch Drive Setup.
- Select the disk and volume you want to initialize, and unmount it if necessary.
- Select Initialize from the Setup menu.
- You have four initialization choices: Be File System, Mac HFS, ISO 9660, or the Old Be File System.
Understanding File Types
The BeOS uses the Internet standard MIME as file types (descriptors). The file types determine how the system and Tracker deal with a file. For example, a files' file type determines which application opens that file when you double-click it. The BeOS lets you change the file type and associated application for a file as well as the associated application for a whole file type.
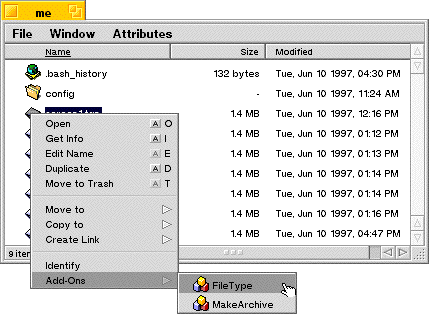
Changing the Type of a File
The primary way to change file type is via the File Type Tracker Add-On that is included with the system. To change a file type this way:
- Select the file you want to associate with an application.
- Click File and Select Add-Ons/FileType.
The File Type Add-On dialog that appears has two sections: the File type and the Preferred application.
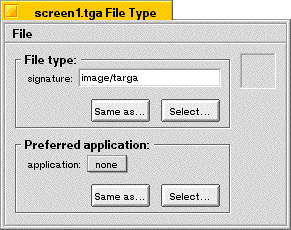
- Drag and drop a file of the type that you want the selected file to have onto the window.
- Make the signature of this file the same as another file on your system by using the Same as button.
- Make the signature of this file the same as those in the scrolling list of known types known to the system by using the Select button.
- Drag and drop the application you want to associate with this file onto the window.
- Make it the same as the application associated with another file via the Same as... button.
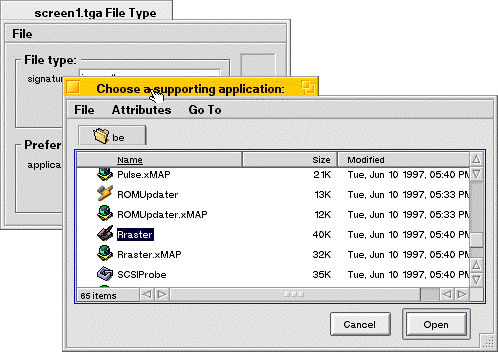
- Select the particular application you want it associated with by using the Select button as shown below:
Changing a File Type
The File Type add-on works on individual files, while the File Type application operates on an entire type of file. In addition to changing the application associated with a particular file type, the File Type application also lets you add and remove MIME types, attributes, file extensions, and associated icons.The top section in the application is a scrolling list of all of the file types known to your system. When new applications are installed, new file types unique to that application are added to the system and this list.
File types are broken into categories like application, audio, image, text, and video. The screen below shows the Person File type. While the system adds new types automatically when you launch new applications, you can also manually add and remove types from the list.
A particular file type is associated with an icon.

The Preferred application section is similar to the File Type add-on except that it establishes the preferred application for all files of a specific type.
The Extra Attributes section displays additional attributes that can be associated with a file type. In the screen above you see that the Person File Type has additional attributes associated with it: contact name, company, etc. You can add or delete attributes and the Tracker will display the updated list.
The File Extensions section displays file extensions that are commonly used on other platforms to identify file types. You can associate a suffix with a file type so it can be identified more easily when moved to other platforms.
File Type for an Application
Developers can use the File Type application to modify the behavior of their application. Because this is a developer function, we do not document it here.
Using the Font Panel
The Font Panel application lets you set standard system fonts and the size of the font caches. There are three types of default system fonts: plain, bold, and fixed-spaced fonts. You can choose the font, size, and style the system uses for each of these categories.
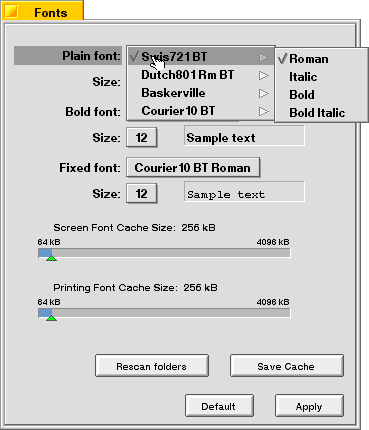
The Font Panel application works in conjunction with the Menu application (see "Setting Menu Preferences" in this chapter) to let you customize the look of applications and dialogs in the BeOS. The Font Panel lets you customize text within dialogs and applications.
To change these characteristics, choose a font, style, and size and click the Apply button.
Setting Keyboard Preferences
When you press a key on the keyboard, a character appears on screen (or some other action takes place). If you hold down a key, the BeOS waits a moment and then acts as if you were repeatedly pressing that key. For example, if you press and hold down a character key when the insertion point is in a text field, a character appears in the field and then after a brief delay, more copies of that character appear. You can use the Keyboard application to increase or decrease the delay between first pressing a key an the key repeating, and to set a key's repeat rate.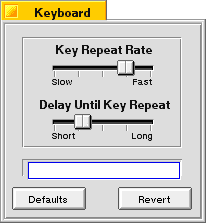
Using the Keymap Application
The Keymap application opens a window that shows you the current keymap, that is, the character you see on-screen when you press each key. You can select a system keymap and type on the keyboard or click keys in the Keymap window to see the resulting character in the field at the top of the Keymap window If you press one or more modifier keys (such as Shift, Option, or Control) on the keyboard or click them in the Keymap window, the keycaps change to show you what characters are mapped to the keys when the modifier keys are pressed.
- Choose any user or system keymap.
- Click File and Save As and enter the name of your new keymap.
- Make sure the keymap is being saved to file:///boot/home/config/settings/keymap.
- To make the keymap selected in the Keymap window active, click Use.
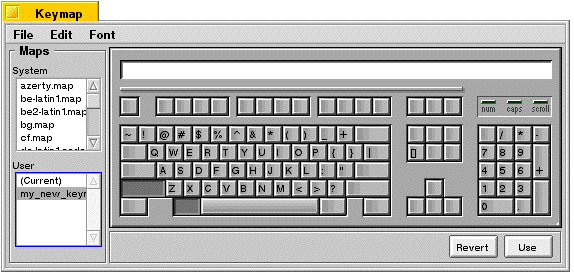
Each keymap is made up of nine mapping tables that show what each key produces when you type it with no modifier key pressed, or with the Shift, Control, or Option key pressed, plus all the possible combinations of these keys.
If you use the tertiary mouse button to drag a character from one keycap to another, you actually drag all nine characters associated with that key in the nine tables in the keymap.
You can revert to the default keymap at any time by choosing one of the standard System keymaps.
Setting Menu Preferences
You can use the Menu preferences application to change the color and other aspects of the appearance of menus throughout the BeOS. You can also use Menu preferences to change how menus behave. When you start the Menu preferences application, a window opens with a set of controls that look like an open menu. You can choose items from this menu to customize the menus in the BeOS.Choose a font from the Font menu and a font size from the Font Size menu that you want to use in menus. The menu in the Menu window changes right away to reflect your choices.
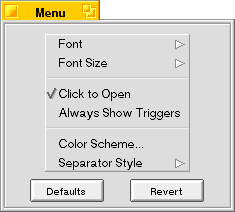
If you uncheck Click to Open, you can't open a menu or submenu by clicking its title -- you can only drag through menus.
If you check Always Show Triggers, triggers for menu titles, commands, and other menu items are always visible, even when you're dragging through menus, rather than just when you're navigating menus from the keyboard or clicking menus and submenus to open them.
Choose Color Scheme to open a color selection panel. When you click a color in the panel (if you're using 8-bit color) or drag one of the red, green, or blue color component sliders (if you're using 32-bit color), the Menu preferences window changes to show how the highlighting and other uses of color in menus will appear. (For more information about setting 8-bit and 32-bit color, see the "Setting Screen and Workspace Preferences" section in this chapter.)
You can choose one of three styles of menu item separators from the Separator Style submenu.
Setting Mouse Preferences
Use the Mouse application to set preferences for the ways a mouse works with the BeOS. You can set whether you're using a one-, two-, or three-button mouse and which buttons you want to use as the primary, secondary, and tertiary mouse buttons (for more information on the role of the mouse and mouse buttons in the BeOS, see "Using the Mouse" in Chapter 2 "Learning BeOS Basics"). You can set how quickly you have to click the mouse button before the BeOS interprets two clicks as a double-click. You can also set how rapidly the cursor moves across the screen when you move the mouse.
When you start up the Mouse application, the Mouse window opens.
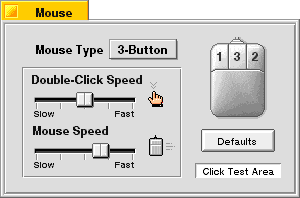
Note: If you have a single-button mouse, you can emulate a three-button mouse by pressing Control-Command while you click the mouse button to emulate the secondary mouse button, and by pressing Control-Option while you click to emulate the tertiary mouse button.
Setting Network Preferences
See Chapter 4,"Connecting Your BeOS System to the Internet" to learn how to set up networking on your computer.
Setting Screen and Workspace Preferences
You can use the Screen and Workspaces applications in tandem to define the configuration of your monitor. Initially, the BeOS works with the graphics card and monitor to display a screen resolution of 640 pixels horizontally and 480 pixels vertically. This display uses 8 bits of color data per pixel (also referred to as the screen depth), and has a refresh rate (the number of times per second the screen is redrawn) of 60.1 Hz. If you have a graphics card and monitor that can accommodate a higher resolution, more colors per pixel, or a faster refresh rate, you can change these settings in the Screen preferences panel.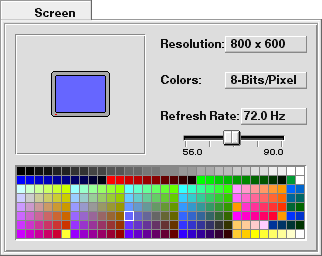
If your graphics card or monitor can't support a setting you make, you may not be able to read anything on the screen -- but if you wait a few seconds, the screen reverts to the previous setting if you don't click OK.
WARNING: You risk damaging the monitor and even starting a fire if you select a resolution, number of colors per pixel, or refresh rate the monitor isn't designed to support. Read the owner's guides that came with your monitor and graphics card to find out what combinations of settings are safe for the monitor.
Adjusting the Screen Size and Position
When the Screen window is the active, you can adjust the size of the screen image on the monitor by holding down the Shift key while pressing the up or down arrow key. You can adjust the position of the screen image by holding down the Control key (the key labeled "Ctrl" in the lower-left corner of most PC keyboards) and pressing the up, down, left, or right arrow key. To restore the default screen size and position, choose Default Position from the Screen window's main menu. Setting a Desktop Color
The desktop -- the "background" of the screen -- is initially solid blue, but you can pick a different color in the Screen window.
Understanding Workspaces
When you first start working with the BeOS, you have one workspace: a desktop and a set of windows that open on it, which you arrange to suit your projects. The BeOS supports up to nine virtual monitors (or panes) via the Workspaces application. Each pane in the Workspaces window represents a workspace, with a miniature version of each window open in that workspace. Each pane can have a different resolution, frequency, bit depth, and color background. Applications can even be running in different workspaces. Configuring Workspaces
One example of the usefulness of Workspaces is in a graphics application where you want to see how a graphic looks in both 8 bits and 32 bits. You can simply move the graphic between a 32-bit workspace and an 8-bit workspace to see the how the graphic looks in the different environments.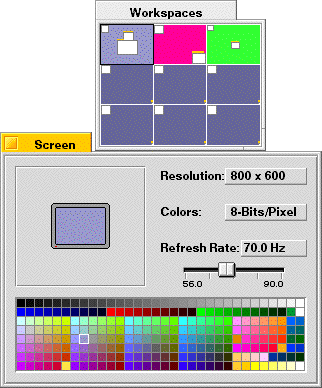
Navigating Workspaces
Click in a pane to switch to that workspace. You can also switch workspaces by holding down the Command key while pressing the function key that corresponds to that workspace (counting from left to right, top to bottom in the Workspaces window): Command-F1 to switch to the first workspace, Command-F2 to switch to the second, and so on. The workspace you're currently working in is called the active workspace.
- You can enter a workspace and then launch the application.
- You can drag an application window into another pane to have that window reside there.
- You can drag an application's icon into a pane in the Workspaces window to start it in that workspace.
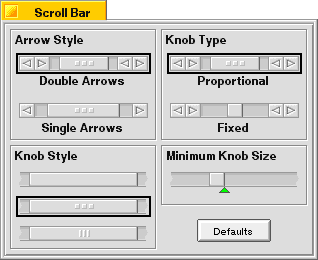
Setting Scroll Bar Preferences
Initially, many windows in the BeOS use proportional scroll bars, as described in the chapter "Learning BeOS Basics" in "Scrolling the Items in a Window." If you don't like proportional scroll bars, you can use the ScrollBar application to set your preference to a fixed-size scroll knob and make some other choices about how scroll bars look and behave.
Selecting a Printer
See "Printing With the BeOS" in Chapter 3, "Learning Be Application Basics."
Setting Sound Preferences
You can use the Sound application to select the input and output sources and volumes of a number of audio features in the BeOS.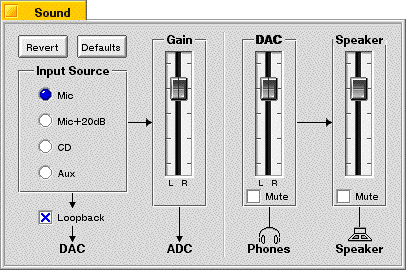
- Mic for a connected microphone.
- Mic + 20dB for a connected microphone with input level boosted 20 decibels.
- CD for sound from the CD-ROM drive.
- Aux for sound from other sound sources.
The Gain slider controls the level into the machine. There are left and right channels that can be controlled separately (via the secondary mouse button) or as one. To move them separately, click on the left or right half of the slider.
The DAC slider controls the volume going out the headphone jack port. It too has a left and right channel that can be controlled separately.
The Speaker slider controls the volume of the internal computer speaker.
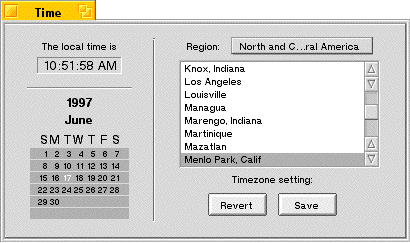
Setting Time Preferences
Clock circuitry on the computer motherboard keeps the time, even when the computer is turned off. You set the date and time with the Time application. When you start Time, a window opens with the computer's notion of the current date and time. Click the component of the date or time you want to change and then set the correct date or time using the controls for that component. You can make these adjustments using the small arrows; type an hour, minute, or second; or directly click a date on the calendar. Your changes take effect immediately.
Setting Virtual Memory Preferences
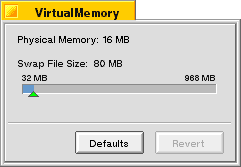
The Virtual Memory application allows you to set the amount of hard disk space to use for Virtual Memory. The Window displays the RAM installed (Physical Memory) and the amount of hard drive space allocated (Swap File Size). To change the amount of hard drive space allocated, drag the green triangle to set the desired amount.
Adding Fonts
The BeOS includes a TrueType font renderer, which displays TrueType-format fonts on the screen at virtually any size. The standard set of TrueType fonts included with the BeOS is stored in the file://boot//beos/system/fonts/ttfonts folder. These are the system fonts and you should not change them.You can purchase or download additional TrueType fonts in PC (not Macintosh) format and add them to the BeOS, so they're available in applications that work with fonts, such as StyledEdit and FontDemo. A few kinds of TrueType fonts don't work with the BeOS, but most do.
- Move the fonts to the file://boot/ /home/config/fonts/ttfonts folder on the BeOS hard disk.
- Make sure the fonts have the .ttf extension (uppercase letters don't work).
- Restart the BeOS.
Adding Add-Ons
You can add software to the BeOS that extends the functionality of applications and the system. This kind of software is called an add-on. BeOS system add-ons are stored in the file:///boot/beos/system/add-ons folder and should not be changed. User configurable add-ons are stored in the file:///boot/home/config/add-ons. Add-ons can be for various parts of the system: the app_server, Drive Setup, kernel, net_server, Print, Raster, and Tracker, as well as for any application.Installing an add-on is easy: just move it into the appropriate folder in the file:///boot/home/config/add-ons folder on the boot disk. Tracker Add-Ons should be placed in the Tracker folder, application add-ons should be placed in the add-on folder associated with that application. See the documentation which came with the new add-on for the correct name and location.
Adding a Driver
You can add software to the BeOS that makes it work with new kinds of devices or with familiar devices in new ways. This software is called a driver. In the BeOS there are two kinds of drivers: graphics card drivers (sometimes called graphics drivers) and all other kinds of drivers. Standard BeOS drivers are stored in the file:///boot/beos/system/add-ons/kernel and file:///boot/beos/system/add-ons/app_server folders and should not be changed.
To add a graphics card driver, copy it into the file:///boot/home/config/add-ons/app_server folder and restart the BeOS.
Caution: Don't replace, rename, or delete the supervga file in the /system/add-ons/app_server folder, or you won't be able to restart the BeOS.
To add any other kind of driver, copy it into the file:///boot/home/config/add-ons/kernel folder and restart the BeOS.
[Contents] [Prev] [Next] [Index]
http://www.be.com/ Copyright © 1997, Be, Incorporated. All rights reserved.