Agents
Overview
Netscape Web Publisher allows you to use server agents to manage server files and folders. Agents act as watchdogs for you, watching for a specific event or time, and then performing a task for you. For example, you could set up an agent to notify you when a specific URL has been updated. The notification could be an email message or a posting to a newsgroup.An agent is stored on the server, so you must be connected to the server when you create the agent although you do not need to be connected when the agent is activated. The agent resides on the server until it is deleted or completes the assigned task.
Note
If your system administrator has turned web publishing off, all agents for the server are also turned off and you cannot use Netscape Web Publisher to access agent setup and list commands.
Types of agents
There are several types of agents, each of which has a particular use. The following sections mention some sample events for each category.Timer agents
Timer agents respond to time-related events that occur as a result of the date or time. You can submit an agent to activate at the following times:Document agents
Document agents respond to document-related events that take place when something has occurred to the indicated document. Some examples are:Directory agents
Directory agents respond to directory-related events that take place when something has occured to the indicated directory. Some examples are:Search agents
Search agents execute periodically, searching the content of server document collections such as the server's web publishing collection. When documents are found that match the search criteria, they are listed as the search results. You can limit the content search to recently modified documents or you can extend the search to include all server documents. Some examples of search agent tasks are:- Check the server at 5 a.m. every Monday morning for all documents that have been modified in the preceding week.
- Check the server at 5 a.m. every Monday morning for all documents that contain the string "JavaScript" that have been modified in the preceding week.
- Check the server at 5 a.m. on the first of each month for all documents with the word Netscape in their title.
Agent actions
When an event occurs that an agent is monitoring, the agent activates and begins to perform its assigned actions. For example, typical agent actions include:Access control and secure servers
Your server administrator can configure how your server manages agents. By default, you can view and modify only your own agents. In addition, the server checks your access control permissions when you create an agent, only authorizing valid users. The server again checks access permissions when the agent activates, making sure that the document or folder can be accessed. Agents can only perform operations that you are authorized to perform.Secure servers
You can create an agent on a secure server as well as on a regular non-secure server, but when the agent is activated, it cannot perform HTTP Get or Post actions on secure servers because the agent does not provide authentication data. Likewise, if an agent is intended to send emails or post to newsgroups on secure servers, these actions will fail because the agent cannot validate itself.HTTP Get or Post actions that include an URL under an access control restriction will also fail, even if the URL is on a regular non-secure server.
When an agent action fails, the notification email is still sent, but it will only include the parts that succeed. For example, if a user defined
If a search agent is created on a secure server, it will fail when the search results are returned to the server. Although the search agent runs on the same secure server where it was created, the search fails because the server requires authentication, which the agent cannot provide.
Accessing agent services
To access agent services through Web Publisher, you can use the Web Publisher menu commands or, if you are at the Netscape Web Publisher Services form, you can use the Agent Services link.From the Web Publisher applet window:
- From the Services menu, choose Create Agent or Agent Services. The Agent Services form is displayed.
If you had selecteda file in the Web Publisher window and you chose Create Agent, the New Document Agent page is displayed in the right frame document with your file listed as the document to monitor. If you had chosen a folder instead, the New Directory Agent page is displayed with your folder listed as the directory to monitor.

Standard and advanced options
There is a link at the bottom of the left frame that allows you to access additional options for creating agents.Most users perform a standard set of agent tasks, and the Standard options provide a simplified interface for these tasks. If you require additional capabilities, you can access a more complex interface by selecting the Advanced options.
Creating agents
You can create agents with a standard set of options or with additional (advanced) options. Once you create an agent, you are considered the owner of that agent and only you can view or modify it.Creating document agents
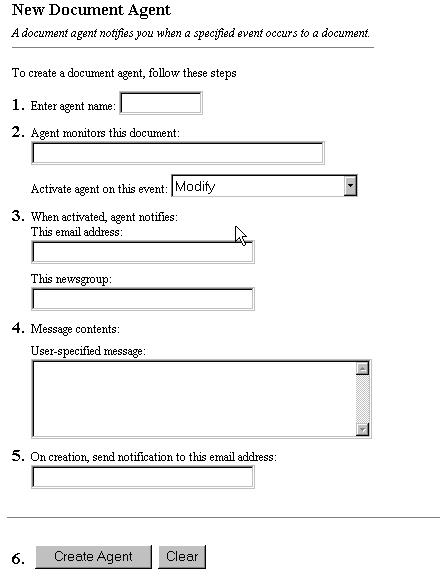
To create a document agent using the standard set of options, begin by obtaining the New Document Agent page.Figure 6-2: The standard New Document Agent page
To create an agent with the standard set of options:
- Click the "Standard Options" link at the bottom of the left frame.
- Click the Document Agent link in the New Agent frame. The New Document Agent form appears, with instructions to enter information as requested for each of the steps.
If it is labeled "Advanced Options," you are already at the standard set of options, so you do not need to choose it.
- Click the "Advanced Options" link at the bottom of the left frame.
- Click the Document Agent link in the New Agent frame. The New Document Agent form appears, with instructions to enter information as requested for each of the steps.
If it is labeled "Standard Options," you are already at the advanced set of options, so you do not need to choose it.
Using the standard options
To create a document agent using the standard set of options, follow these steps:- Type in the name you want to give the agent. Choose a name that helps you remember its function. Only 17 characters are visible at at time.
- Type in the URI of the document (file) you want the agent to monitor. You need to include a slash before the filename so the server can locate it correctly, as in /index.html.
In this step, you also select the Web Publisher event you want to activate the agent from the scrollable list. If the document is modified or otherwise manipulated through some other file management program, the agent is not activated. These are the actions you can monitor:
- Modify--The document is published.
- View--The document is viewed (that is, "hit" or accessed).
- Delete--The document is deleted.
- Move--The document is moved or renamed.
- Copy--The document is copied.
- View Document Attributes--The document's attributes are viewed.
- Modify Document Attributes--The document's attributes are modified.
- Document Locked--The document is locked.
- Document Unlocked--The document is unlocked.
Using the advanced options
To create a document agent using the advanced set of options, follow these steps:- Type in the name you want to give the agent. Choose a name that helps you remember its function. Only the first 17 characters are visible at a time.
- Type in the URI of the document (file) you want the agent to monitor. You need to include a slash before the filename so the server can locate it correctly, as in /index.html.
In this step, you also select the Web Publisher event you want to activate the agent from the scrollable list. If the document is modified or otherwise manipulated through some other file management program, the agent is not activated. These are the actions you can monitor:
- Modify--The document is published.
- View--The document is viewed (that is, "hit" or accessed).
- Delete--The document is deleted.
- Move--The document is moved or renamed.
- Copy--The document is copied.
- View Document Attributes--The document's attributes are viewed.
- Modify Document Attributes--The document's attributes are modified.
- Document Locked--The document is locked.
- Document Unlocked--The document is unlocked.
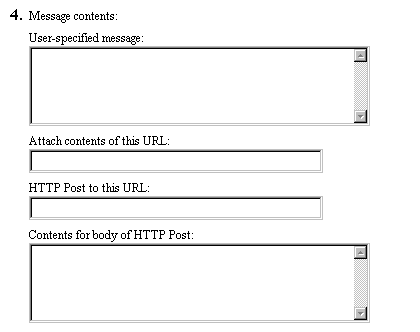
- Type in a user-specified message to be included as part of the notification.
- Identify a URL whose contents are to be included as part of the notification.
- Identify a URL to which you want to perform an HTTP Post.
- You can define the URL-encoded message you want included as part of the HTP Post.
- Type in the email address of the person or groups to notify when the agent is created. You can enter more than one email address, separated by commas, but only the first address is used in the standard Reply To field.
- You can change the maximum activations for an agent or its expiration date, although you cannot extend beyond the limits set by your server administrator. .
- Click Create Agent to create the agent or Clear to clear the fields.
Note
If you are using HTTP Post operations, you may find it easiest to use some of the Agent API code provided as samples in the default installation of Netscape Enterprise Server 3.0. You can access the sample code files in the /plugins/agents/examples directory for your server. The API code builds an HTTP Post method for you that you can revise and use as the Post message contents. For example, the following code appears in the agentapi.cpp file.
...
if (urltopost) {
        //build the post message
        sprintf(header, "Content-Length:%d\n\
        Content-Type: application/x-www-form-urlencoded' charset=US-ASCII\n\
        Content-Transfer-Encoding: 7-bit",strlen(postmessage));
        sprintf(post_msg, "%s\n\n%s\n", header, postmessage);
}...
Creating directory agents
To create a directory agent using the standard set of options, begin by obtaining the New Directory Agent form.Figure 6-4: The standard New Directory Agent page

To create an agent with the standard set of options:
- Click the "Standard Options" link at the bottom of the left frame.
- Click the Directory Agent link in the New Agent frame. The New Directory Agent form appears, with instructions to enter information as requested for each of the steps.
If it is labeled "Advanced Options," you are already at the standard set of options, so you do not need to choose it.
- Click the "Advanced Options" link at the bottom of the left frame.
- Click the Directory Agent link in the New Agent frame. The New Directory Agent form appears, with instructions to enter information as requested for each of the steps.
If it is labeled "Standard Options," you are already at the advanced set of options, so you do not need to choose it.
Using the standard options
To create a directory agent using the standard set of options, follow these steps:- Type in the name you want to give the agent. Choose a name that helps you remember its function. Only 17 characters are visible at a time.
- Type in the URI of the directory (folder) you want the agent to monitor. You need to include a slash before the directory's name so the server can locate it correctly, as in /products.
In this step, you also select the Web Publisher event you want to activate the agent from the scrollable list. If the directory is modified or otherwise manipulated through some other file management program, the agent is not activated. These are the actions you can monitor:
- Document added/deleted--A document in the agent directory is added or deleted.
- Directory Listed--The directory contents are listed, which occurs when a directory is opened in the Web Publisher file window.
- Delete--The directory is deleted.
- Move Directory--The directory is moved or renamed.
- Copy Directory--The directory is copied.
- View Directory Attributes--The directory's attributes are viewed.
- Modify Directory Attributes--The directory's attributes are modified.
Using the advanced options
To create a directory agent using the advanced set of options, follow these steps:- Type in the name you want to give the agent. Choose a name that helps you remember its function. Only the first 17 characters are visible at a time.
- Type in the URI of the directory (folder) you want the agent to monitor. You need to include a slash before the filename so the server can locate it correctly, as in /products.
In this step, you also select the Web Publisher event you want to activate the agent from the scrollable list. If the document is modified or otherwise manipulated through some other file management program, the agent is not activated. These are the actions you can monitor:
- Document added/deleted--A document in the agent directory is added or deleted.
- Directory Listed--The directory contents are listed, which occurs when a directory is opened in the Web Publisher file window.
- Delete--The directory is deleted.
- Move Directory--The directory is moved or renamed.
- Copy Directory--The directory is copied.
- View Directory Attributes--The directory's attributes are viewed.
- Modify Directory Attributes--The directory's attributes are modified.
- Type in a user-specified message to be included as part of the notification.
- Identify a URL whose contents are to be included as part of the notification.
- Identify a URL to which you want to perform an HTTP Post.
- You can define the URL-encoded message you want included as part of the HTP Post.
Note
If you are using HTTP Post operations, you may find it easiest to use some of the Agent API code provided as samples in the default installation of Netscape Enterprise Server 3.0. You can access the sample code files in the /plugins/agents/examples directory for your server. The API code builds an HTTP Post method for you that you can revise and use as the Post message contents. For example, the following code appears in the agentapi.cpp file.
...
if (urltopost) {
        //build the post message
        sprintf(header, "Content-Length:%d\n\
        Content-Type: application/x-www-form-urlencoded' charset=US-ASCII\n\
        Content-Transfer-Encoding: 7-bit",strlen(postmessage));
        sprintf(post_msg, "%s\n\n%s\n", header, postmessage);
}...
Creating timer agents
To create a timer agent using the standard set of options, begin by obtaining the New Timer Agent form.To create an agent with the standard set of options:
- Click the "Standard Options" link at the bottom of the left frame.
- Click the Timer Agent link in the New Agent frame. The New Timer Agent form appears, with instructions to enter information as requested for each of the steps.
If it is labeled "Advanced Options," you are already at the standard set of options, so you do not need to choose it.
- Click the "Advanced Options" link at the bottom of the left frame.
- Click the Timer Agent link in the New Agent frame. The New Timer Agent form appears, with instructions to enter information as requested for each of the steps.
If it is labeled "Standard Options," you are already at the advanced set of options, so you do not need to choose it.
Using the standard options
To create a timer agent using the standard set of options, follow these steps:- Type in the name you want to give the agent. Choose a name that helps you remember its function. Only 17 characters are visible at a time.
- Indicate when you want the agent to activate by making a selection and providing its associated data:
- Once only, or Now (to make the agent active as soon as it is created) If you do not check Now as the activation time, type in the exact date and time when you want the agent to activate. .
- Every (periodically on a regular basis)
- On the same day of the week Check the checkbox for one or more days of the week on which the agent is to execute.
Type in a number and select the periodic interval from the drop-down list: minutes, hours, days, months, or years. This cannot be a smaller interval than the minimum defined for your server by your server administrator.
Enter the beginning time for the agent's activation period, or check Now to make the agent active as soon as it is created.
Enter the time when the agents expires. You cannot create an agent that extends beyond your server's default expiration date for agents.
Enter the beginning time for the agent's activation period, or check Now to make the agent active as soon as it is created.
Enter the time when the agents expires. You cannot create an agent that extends beyond your server's default expiration date for agents.
- Type in the email address of the user or newgroups to notify when the event occurs for the document. You can enter more than one email address or newsgroup, separated by commas.
- Enter any user-specified message contents you want added to the email sent as notification.
- Type in the email address of the person or groups to notify when the agent is created.You can enter more than one email address, separated by commas., but only the first address is used in the standard Reply To field.
- Click Create Agent to create the agent or Clear to clear the fields.
Using the advanced options
To create a timer agent using the advanced set of options, follow these steps:- Type in the name you want to give the agent. Choose a name that helps you remember its function. Only 17 characters are visible at a time.
- Indicate when you want the agent to activate by making a selection and providing its associated data (See Figure 6.5):
- Once only, or Now (to make the agent active as soon as it is created) If you do not check Now as the activation time, type in the exact date and time when you want the agent to activate. .
- Every (periodically on a regular basis)
- On the same day of the week Check the checkbox for one or more days of the week on which the agent is to execute.
Type in a number and select the periodic interval from the drop-down list: minutes, hours, days, months, or years. This cannot be a smaller interval than the minimum defined for your server by your server administrator.
Enter the beginning time for the agent's activation period, or check Now to make the agent active as soon as it is created.
Enter the time when the agents expires. You cannot create an agent that extends beyond your server's default expiration date for agents.
Enter the beginning time for the agent's activation period, or check Now to make the agent active as soon as it is created.
Enter the time when the agents expires. You cannot create an agent that extends beyond your server's default expiration date for agents.
- Type in the email address of the user or newgroups to notify when the event occurs for the document. You can enter more than one email address or newsgroup, separated by commas.
- You can define your message contents in these ways (See Figure 6.3):
- Type in a user-specified message to be included as part of the notification.
- Identify a URL whose contents are to be included as part of the notification.
- Identify a URL to which you want to perform an HTTP Post.
- You can define the URL-encoded message you want included as part of the HTP Post.
Note
If you are using HTTP Post operations, you may find it easiest to use some of the Agent API code provided as samples in the default installation of Netscape Enterprise Server 3.0. You can access the sample code files in the /plugins/agents/examples directory for your server. The API code builds an HTTP Post method for you that you can revise and use as the Post message contents. For example, the following code appears in the agentapi.cpp file.
...
if (urltopost) {
        //build the post message
        sprintf(header, "Content-Length:%d\n\
        Content-Type: application/x-www-form-urlencoded' charset=US-ASCII\n\
        Content-Transfer-Encoding: 7-bit",strlen(postmessage));
        sprintf(post_msg, "%s\n\n%s\n", header, postmessage);
}...
Creating search agents
To create a search agent using the standard set of options, begin by obtaining the New Search Agent form.To create an agent with the standard set of options:
- Click the "Standard Options" link at the bottom of the left frame.
- Click the Search Agent link in the New Agent frame. The New Search Agent form appears, with instructions to enter information as requested for each of the steps.
If it is labeled "Advanced Options," you are already at the standard set of options, so you do not need to choose it.
- Click the "Advanced Options" link at the bottom of the left frame.
- Click the Search Agent link in the New Agent frame. The New Search Agent form appears, with instructions to enter information as requested for each of the steps. This is a Java applet that provides additional searching capabilities.
If it is labeled "Standard Options," you are already at the advanced set of options, so you do not need to choose it.
Using the standard options
To create a search agent using the standard set of options, follow these steps:1. Type in the name you want to give the agent. Choose a name that helps
you remember its function. Only 17 characters are visible at a time.
2. Indicate when you want the agent to activate by making a selection and providing its associated data (See Figure 6.5):
- Once only, or Now (to make the agent active as soon as it is created) If you do not check Now as the activation time, type in the exact date and time when you want the agent to activate. .
- Every (periodically on a regular basis)
- On the same day of the week Check the checkbox for one or more days of the week on which the agent is to execute.
Type in a number and select the periodic interval from the drop-down list: minutes, hours, days, months, or years. This cannot be a smaller interval than the minimum defined for your server by your server administrator.
Enter the beginning time for the agent's activation period, or check Now to make the agent active as soon as it is created.
Enter the time when the agents expires. You cannot create an agent that extends beyond your server's default expiration date for agents.
Enter the beginning time for the agent's activation period, or check Now to make the agent active as soon as it is created.
Enter the time when the agents expires. You cannot create an agent that extends beyond your server's default expiration date for agents.
3. Type in the email address of the user or newgroups to notify when
the event occurs for the document. You can enter more than one email address
or newsgroup, separated by commas.
4. You can define your message contents in these ways:
- Choose the scope of your search by clicking the All Documents or Document Updated Since Last Activation.
- Choose from the drop-down list the collection you want to search through. The default is the Web Publishing collection. See Chapter 5, "Search" for more information about performing searches.
- In the Search For field, enter the word or phrase you want to search for. Enter * to collect all documents that have been updated since the last search
- Type in a user-specified message to be included as part of the notification.
5. Type in the email address of the person or groups to notify when
the agent is created.You can enter more than one email address, separated
by commas., but only the first address is used in the standard Reply To
field.
6. Click Create Agent to create the agent or Clear to clear the fields.
Using the advanced options
When you choose to create an advanced search agent, you do so in a Java applet that guides you through making a search query. Note that to use the applet, you must have Java enabled for your browser.Note
Much of the search functionality is discussed at length in Chapter 5, "Search." Read that chapter for further details on search queries. The search agent uses the same query language, with the same set of rules and restrictions.To create a search agent using the advanced set of options, follow these steps :
1. Type in the name you want to give the agent. Choose a name that helps
you remember its function. Only 17 characters are visible at a time.
2. Indicate when you want the agent to activate by making a selection and providing its associated data (See Figure 6.5):
- Once only, or Now (to make the agent active as soon as it is created) If you do not check Now as the activation time, type in the exact date and time when you want the agent to activate. .
- Every (periodically on a regular basis)
- On the same day of the week Check the checkbox for one or more days of the week on which the agent is to execute.
Type in a number and select the periodic interval from the drop-down list: minutes, hours, days, months, or years. This cannot be a smaller interval than the minimum defined for your server by your server administrator.
Enter the beginning time for the agent's activation period, or check Now to make the agent active as soon as it is created.
Enter the time when the agents expires. You cannot create an agent that extends beyond your server's default expiration date for agents.
Enter the beginning time for the agent's activation period, or check Now to make the agent active as soon as it is created.
Enter the time when the agents expires. You cannot create an agent that extends beyond your server's default expiration date for agents.
3. Type in the email address of the user or newgroups to notify when
the event occurs for the document. You can enter more than one email address
or newsgroup, separated by commas..
4. You can define your message contents in these ways:
- Choose the scope of your search by clicking the All Documents or Document Updated Since Last Activation.
- Define your search query by using the embedded Java applet.
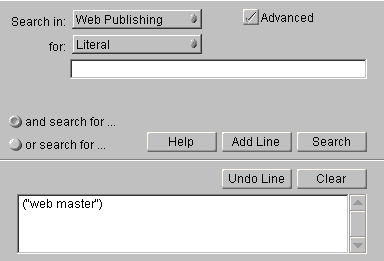
Java searchYou can use the embedded Java applet to guide you through constructing a search query. This is especially useful if you want to build a query that has several parts, say searching for a word in the documents' content as well as a specific attribute value.
A. Select the collection you want to search against by choosing an item from the Search In drop-down list.
B. Select the type of search element you want to search for from the drop-down list in the Search For field. You can search on these elements:
- words: any word or words in the document's content. If you input more than one word, they can be found in any order in the document and do not need to be next to each other.
- words in proximity: two or more words in a document, with a relevency ranking for higher proximity (the closer the words are to each other, the higher the score).
- phrase: two or more words in a document next to each other in the exact same sequence as in the query.
- literal: one or more words that are to be interpreted exactly as they are, without stemming or rearranging the word sequence.
- attribute: a file property that has been defined for the collection. These are listed in a drop-down list.
- any pattern: any text pattern.
(4 cont.) Here you return to the HTML form, where you can define some additional agent message contents in these ways (See Figure 6.3):
C. If you selected attribute from the Search For drop-down list, two additional drop-down lists are displayed. One lists the file attributes that are available for the collection and the other lists the operators you can use to search against the attributes: contains, ends, starts, substring, and matches. See "Query operators: a reference" in Chapter 5, "Search" for information about these operators.
D. To construct queries with multiple AND and OR statements, click the "and search for" and "or search for" radio buttons in the lower left part of the form.
E. Click Add Line after creating a query to add another statement. As the query is being constructed, you can see it displayed at the bottom of the applet. You can click Undo Line to remove the last line you added or Clear to remove the entire query.
F. Click Search to check your search query or Clear to clear the query.
5. Type in the email address of the person or groups to notify when
the agent is created. You can enter more than one email address, separated
by commas, but only the first address is used in the standard Reply To
field.
6. You can change the maximum activations for an agent or its expiration
date, although you cannot extend beyond the limits set by your server administrator.
.
7. Click Create Agent to create the agent or Clear to clear the fields.
Note
If you are using HTTP Post operations, you may find it easiest to use some of the Agent API code provided as samples in the default installation of Netscape Enterprise Server 3.0. You can access the sample code files in the /plugins/ agents/examples directory for your server. The API code builds an HTTP Post method for you that you can revise and use as the Post message contents. For example, the following code appears in the agentapi.cpp file.
...
if (urltopost) {
        //build the post message
        sprintf(header, "Content-Length:%d\n\
        Content-Type: application/x-www-form-urlencoded' charset=US-ASCII\n\
        Content-Transfer-Encoding: 7-bit",strlen(postmessage));
        sprintf(post_msg, "%s\n\n%s\n", header, postmessage);
}...
Viewing and managing agents
You view only those agents that you have created. Once you are viewing an agent, you can perform some additional management tasks for it: You can modify certain fields, you can delete the agent, and you can disable and reenable an agent.To view an agent, follow these steps:
- In the left frame, select an agent from the scrollable View Agent list. All of your agents are listed.
- Click the View button.
- The agent's information is displayed in the right frame. This data differs according to the type of agent you are viewing. You can now modify, delete, and disable the agent.
Viewing document or directory agents
When you view a document or directory agent, data is displayed that is specific for that type of agent.- Agent name--The name of your agent.
- Agent ID--The agent's internal identifier.
- Status--The current status for the agent: enabled or disabled.
- Type of agent--The type of agent (document or directory).
- Document (or Directory) monitored--The URI of the file (or folder) that is monitored by the agent.
- For event--The event for which the file is monitored.
- Activations--The number of times the agent has already been activated.
- Last activated--The date and time of the last agent activation.
- Created--The date and time when the agent was created.
- Last modified--The date and time of the last modification to the agent.
- Creation notification to--The email address to which notification was sent when the agent was created.
- Message contents--There are several fields that display whatever message contents are associated with this agent.
Viewing timer and search agents
When you view a timer or search agent, data is displayed that is specific for that type of agent.- Agent name--The name of your agent.
- Agent ID--The agent's internal identifier.
- Type of agent--The type of agent (timer or search).
- Type of Timer--The type of timer agent (once only, periodic, or weekday).
- Start time--The date and time at which the timer agent is to be activated.
- Next Activation--The date and time at which the agent will next be activated.
- Activations--The number of times that the agent has already been activated.
- Last activated--The date and time of the last agent activation.
- Created--The date and time when the agent was created.
- Last modified--The date and time of the last modification to the agent.
- Creation notification to--The email address to which notification was sent when the agent was created.
- Message contents--There are several fields that display whatever message contents are associated with this agent.
Modifying an agent
You can modify most of the agent options. For document and directory agents, you cannot change the document (or directory) and event that the agent is monitoring. For timer and search agents, you cannot change the timing of the agent's activation. If you wish to modify the unmodifiable fields, you must delete the agent and create a new agent.- View the agent. See "Viewing and managing agents" for the steps for this.
- You can modify the message contents, the maximum activations allowed for the agent, and, for document and directory agents, the agent's expiration date..
- Click the Modify Agent button at the bottom of the frame.
Deleting an agent
- View the agent. See "Viewing and managing agents" for the steps for this.
- Click the Delete Agent button at the bottom of the frame. A confirmation dialog box is displayed.
- Click OK to delete the agent.
Disabling an agent
- View an enabled agent. See "Viewing and managing agents" for the steps for this.
- Click the Disable Agent button at the bottom of the frame.
This button changes to Enable Agent once the agent has been disabled.
Enabling a disabled agent
- View a disabled agent. See "Viewing and managing agents" for the steps for this.
- Click the Enable Agent button at the bottom of the frame.
This button changes to Disable Agent once the agent has been disabled.
Managing all your agents
You can enable, disable, or delete all of your agents at once. These actions only apply to agents that you created. To do this:- Click the "Advanced Options" link at the bottom of the left frame.
If it is labeled "Standard Options," you are already at the advanced set of options, so you do not need to choose it.
- Click the Delete All button. A confirmation dialog box is displayed.
- Click OK to delete all your agents.