Managing your server
 his chapter describes how to configure and
manage your server using the Netscape Server Administration page and the
Server Manager.
his chapter describes how to configure and
manage your server using the Netscape Server Administration page and the
Server Manager.
During installation, you specified a port number for the administration server. The administration server helps you manage your Netscape Enterprise Server (or multiple servers) from a single interface--the Netscape Server Administration page. From this page you can access the Server Manager, which is a collection of forms you use to change options and control your web server.
This chapter contains sections on using the Server Administration page and Server Manager.
Using the Server Administration page
You configure your administration server and access the configuration forms for other Netscape servers (including the Netscape Enterprise Server) with the Netscape Server Administration page. This page contains links to the Server Managers for the Netscape servers you have installed.
You can perform the following web server tasks from the Server Administration page:
- Choose a server to configure.
- Install another web server on the machine.
- Remove a server from the list of servers you can configure.
- Start and stop a web server.
- Import or migrate from a 2.x web server to a 3.0 web server.
Accessing the Server Administration page
If you stopped the administration server after installation, you must start the administration server before you can configure your web server. Go to the server root directory and type ./start-admin. This starts the administration server using the port number you specified during installation.As long as you have access to client software such as Navigator, you can access the Server Administration page to configure your web server.
To access the Server Administration page:
- Using a browser that supports frames and JavaScript, such as Netscape Navigator, type the URL for the administration server:
- You'll be prompted for a username and password. Type the administration server username and password you specified during the installation.
http://servername.your_domain.domain:port_number/Use the port number for the administration server that you specified during installation; this is not the port number for the web server.
The Server Administration page appears, as shown in Figure 3.1.
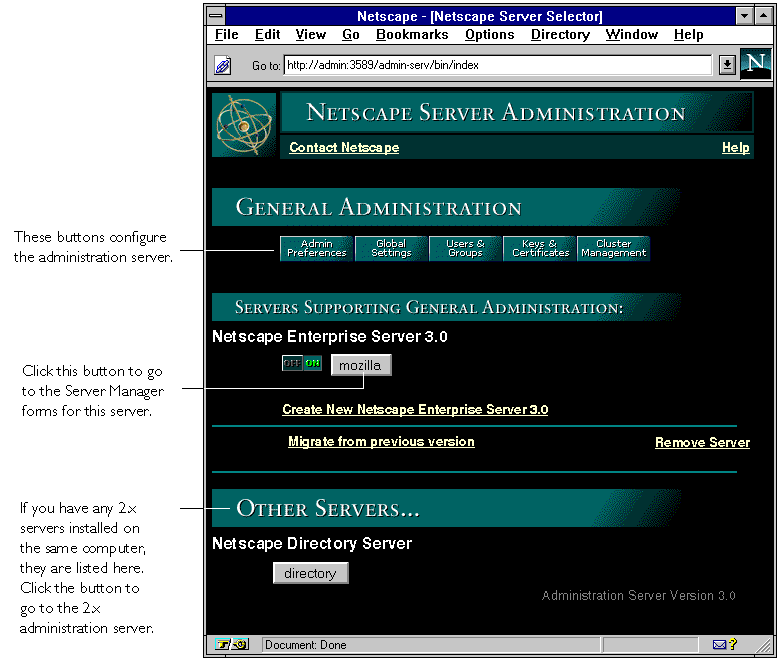
The Server Administration page lists all the servers you've installed on this system. Click the name of the server you want to configure.
Starting and stopping a web server
 You can start and stop the
servers listed in the Server Administration page by clicking the On/Off
icon located to the left of the server's name.
You can start and stop the
servers listed in the Server Administration page by clicking the On/Off
icon located to the left of the server's name.
Setting up multiple servers
There are three ways you can have multiple web servers on your system: Each approach has its strengths and weaknesses; you should choose the one that's right for your situation.If you install multiple instances of the server, you can have separate configuration information. For example, one instance of the server could have security features or web publishing enabled while another server could have them disabled. However, each instance of the server takes substantial resources of RAM, disk space, and swap space.
Hardware virtual servers allow you to map multiple IP addresses to multiple document roots. For example, if you have two IP addresses, you could map the first IP address to one document root and the second IP address to a second document root. While hardware virtual servers take fewer system resources than multiple instances of the server, they must share the same configuration information. For example, if one hardware virtual server has enabled security features or web publishing, they all must have it enabled.
Software virtual servers give you the ability to map a single IP address to multiple server names. Each software virtual server can have its own home page. One use for this is to host multiple web sites from one IP address. However, in order for software virtual servers to work correctly, the users accessing the server must be using client software that supports the HTTP Host header. Like hardware virtual servers, software virtual servers all must have the same configuration.
For more information on virtual servers, see "Setting up hardware virtual servers" on page 61 and "Setting up software virtual servers" on page 62.
Installing multiple instances of the web server
You can install another instance of the web server on your current computer without going through the installation program. Your web server software license allows you to have as many web server instances as you want on one system. Each web server you have installed can run on any TCP/IP port on your system, but you cannot run two web servers on the same port at the same time unless they are configured to respond to different IP addresses. Contact your system's vendor for information on how to configure your system to respond to different IP addresses.If your system is configured to listen to multiple IP addresses, for each server you install enter one of the IP addresses that your system is hosting.
If you installed your server before configuring your system to host multiple IP addresses, configure your system to respond to different IP addresses. Then you can either install hardware virtual servers or change the server's bind address using the Server Manager (see "Configuring network settings" on page 82) and install separate instances of the server for each IP address.
To install another web server with its own separate configuration files:
- Click Create New Netscape Enterprise Server from the Server Administration page.
- Enter values for the following:
- Server name--Type the fully qualified domain name for your server. If you are installing a second server for a custom domain, enter the domain here.
- Bind address--If you're installing another server in order to have your machine answer to multiple IP addresses, enter the IP address that this instance of the server should listen to. Your system should already be configured to listen to multiple IP addresses. If you're not going to use multiple IP addresses, you can leave this field blank.
- Server port--Type the number of the port that you want this server to listen to.
- Server identifier--Type the server identification that the administration server will use for your web server (for example, marketing_server). This name is used to identify the server's subdirectory in the server root.
- Server user--Type the username you want the server to run as. The server user should only have restricted access to your system resources. You can often use a user named nobody in this situation. On some systems, however, nobody isn't a valid username. Also, the server user should have group access to certain files used by all Netscape SuiteSpot servers. You might not want to give the user nobody group access to those files. If you do not use nobody, create a new Unix user to be the server user. If you are unfamiliar with creating Unix users, see your system administrator or your system documentation.
- MTA host--Type the Message Transfer Agent (MTA) host. You must enter a valid MTA host if you want to use the agent email function.
- NNTP host--Type the NNTP Network News Transfer Protocol (NNTP) host. You must enter a valid NNTP host if you want to use agents with the capability to post to news.
- Document root--Type this server's document root, which is the directory that contains most of your server documents.
Migrating a server from a previous version
You can migrate a server from 2.x to 3.0 using the administration server. Your 2.x server is preserved, and a new 3.0 server using the same settings is created.You should stop running the 2.x server before migrating settings. Make sure you have Netscape Navigator 3.0 or later installed on your computer before migrating settings.
- From the Netscape Server Administration page, click the "Migrate from previous version" link. The Choose 2.x Server Root to Import From page appears.
- Enter the directory that contains the server from which you want to import settings. Click the Find Servers button. The Choose Servers to Import page appears.
- Click the checkbox next to the server with the settings you want to import. The next page displayed depends upon the server or servers you chose to import settings from. You may need to click an Import button to continue the import.
- When the import of the server is complete, click the Dismiss button.
Removing a server from your system
To remove a server from your system, use the Server Administration page. Be sure that you will not need the server anymore. You can also remove the administration server for the type of server you are deleting. For example, if you are removing an Enterprise Server and no longer plan to install any Enterprise Servers, you could remove the administration server too.- Shut down the server before removing it by clicking the On/Off icon to the left of the server name in the Server Administration page.
- Click Remove a Server from the Server Administration page.
- Select the server that you want to remove.
- Select whether you want to remove the administration binaries, which include the administration server's configuration files and binaries.
- Caution!
- Verify that you want to remove the server and the administration binaries by clicking the Yes checkboxes for each one you want to remove.
- Click OK.
Do not remove the binaries for the administration server if more than one server is installed.
Using the Server Manager
The Server Manager is the collection of forms you use to change options and control your server. From the Server Administration page, which lists all the servers installed on your system according to identifier, access the Server Manager by clicking the button showing the server name (located next to the On/Off icon). The Server Manager appears. (You can use the Server Manager from any remote system as long as the system you're working on is one of the hosts that can access the administration server; you don't need to be working at the system the server is installed on.)Note
When changing server information, you must save and apply your changes in order for your changes to take place. After you submit a form, you get a pointer to a script that allows you to save and apply your changes.You can return to the Server Administration page by clicking the Admin button in the upper-right corner of the Server Manager. The Server Manager is shown in Figure 3.2.
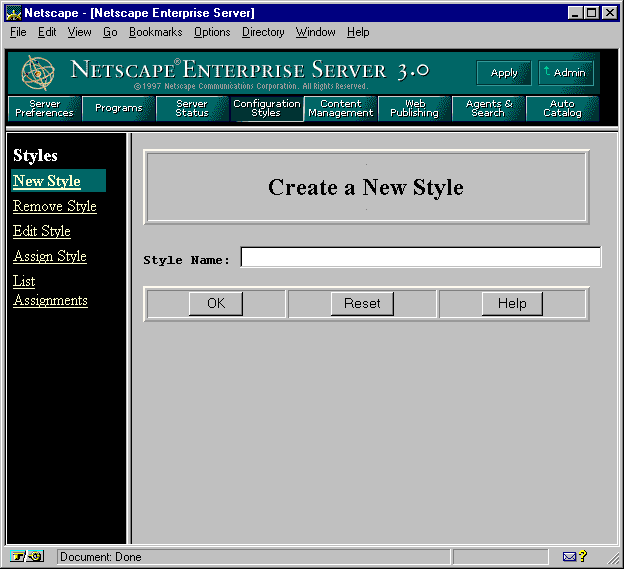
Use the server configuration buttons in the top frame to configure the server. After clicking a button, you'll see a list of items on the left. Click one of these links; the corresponding form comes up in the main frame. If you need more information about a form, click Help for context-sensitive help. In the help window, click Contents to see a list of online manuals you can view.
Using the Resource Picker
Most of the Server Manager forms configure the entire server. Some forms can configure either the entire server or files or directories that the server maintains. These forms have the Resource Picker, shown in Figure 3.3, at the top. The Resource Picker lets you specify what resource to configure. 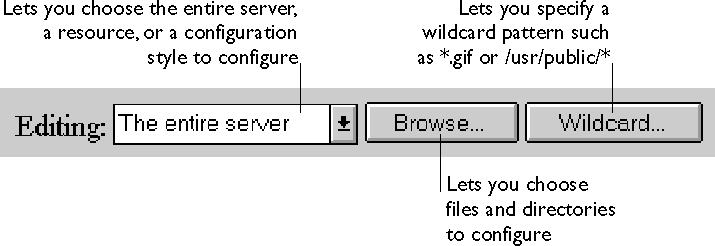
Pick a resource from the drop-down list for configuration. Click Browse to browse your primary document directory; clicking Options allows you to choose other directories. Click Wildcard to configure files with a specific extension.
Wildcards used in the Resource Picker
In many parts of the server configuration, you specify wildcard patterns to represent one or more items to configure. Please note that the wildcards for access control and text search may be different from those discussed in this section.Wildcard patterns use special characters. If you want to use one of these characters without the special meaning, precede it with a backslash (\) character.