Be User's Guide: BeOS Basics
| The Be User's Guide Table of Contents |
BeOS Basics
This chapter shows you how to start up and shut down the BeOS,
describes the fundamentals of the user interface, takes a look at the Deskbar
and Tracker applications, tells you how to take a screen shot, how to search for files and folders,
and so on.
Chapter 2, Be
Application Basics, begins where this one leaves off, covering the basic techniques you use with
Be applications. Later chapters describe the applications that come with the BeOS.
This document assumes that you are familiar with the general operation and features of a computer at the user level—that you know what the mouse and keyboard do, what a window is, how to use a menu, and so on.
This chapter includes the following:
 |
NOTE: The BeBox is supported for BeOS releases until January 1, 2000. For BeBox-related information not included in the main chapters of this guide, see Appendix B: The BeBox Guide. |
Booting the BeOS
After installing the BeOS you're ready to boot from your hard disk. (If you haven't installed yet, see the installation booklet that came with your BeOS Release 4.5 CD-ROM). Make sure there's no CD-ROM with BeOS system software inserted in a drive connected to your computer, and then boot the BeOS:
- BeOS for Intel.
Look for the BeOS Launcher icon on your Windows desktop (the BeOS installer
copies it to your C: drive at C://BeLaunch/BeOSLauncher).
Double-click the icon to launch the BeOS.
- BeOS for PowerPC. Double-click the BeOS Launcher application (in the BeOS Mac Tools folder on the Macintosh hard disk, which you copied from the BeOS CD-ROM as described in the Installation Guide) or choose BeOS when the OS selection dialog appears during startup.
When you boot, the BeOS logo appears briefly as the computer starts to load the Be system software, including the Deskbar and Tracker applications. Together, Deskbar and Tracker serve as the BeOS file management and navigation tool, used for arranging and opening files, starting applications, and so on.
The following sections explain what you see when you boot the BeOS on Intel and PowerPC.
 Booting on Intel
When you boot the BeOS on Intel,
the first thing that runs is the Boot Loader.
This is a program that lets you set some fundamental options while your computer is booting:
You can tell the system which BeOS volume you want to boot from, tell it to boot
into "safe mode" (in case you can't get past the initial splash screen), or
tell it to use the generic "fail-safe" video mode (useful if your graphics card isn't supported).
Normally, the Boot Loader runs "silently". If you want to talk to the Boot Loader as it's running, you have to interrupt it: boot your computer, wait for the BeOS splash screen to appear, and then quickly press and release the spacebar. The Boot Loader main menu appears:
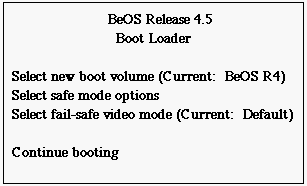
The options are explained in the following sections. Use the arrow keys to highlight an option and press Enter to select it. When you're finished, select Continue booting to continue booting.
Selecting a Boot Volume
If you want to change your boot volume (the BeOS partition that you boot from), highlight the Select new boot volume option and press Enter. You'll see a list of bootable BeOS volumes in the next screen. To make sure the list is complete, the first thing you should do is arrow down to Rescan for bootable volumes and press Enter. This will update the bootable volume list.
|
Note that the R4.5 CD will only appear on the bootable volume list if you booted off of the R4.5 boot floppy (and you have the CD inserted). If you've inserted the CD and you've booted off of the R4.5 boot floppy, but the CD still doesn't appear on the list, see "You can't boot from the boot floppy or the CD," in the "Troubleshooting the Intel Boot Process." section of the R4.5 Installation Guide. |
Choose the volume you want to boot from and press Enter; this will return you to the Boot Loader's main menu. You can also return to the main menu without designating a new boot volume by selecting Return to main menu.
Booting in Safe Mode
If your computer never fully boots—if it doesn't get past the BeOS splash screen—you can try to fix the situation by turning on some "safe mode" options. Enter the Boot Loader and select Select safe mode options. This brings up a menu of seven checkboxes. Check the first option, Safe mode, by pressing Enter, and then return to Boot Loader's main menu (through Return to main menu), and continue booting.
Safe mode is a "blanket" response to your problem; it should almost always work, but it restricts the computer's performance. In particular, it limits your monitor's display to grayscale (to try to bring the color back, see Fail-safe Video Mode, below). If safe mode works—if you can get past the splash screen—you may want to go back to the safe mode checkboxes and try some other options instead of Safe mode—you may find a combination of checkboxes that lets your computer run without affecting performance too much.
The Enable console debugging option is a special checkbox. It doesn't affect how your system runs; instead, it simply prints some startup messages to the screen during the initial part of the boot cycle. This information can be helpful if you need to get in touch with a technical support person.
Finally, the Advanced safe mode options item, below the checkboxes, is reserved for driver-specific options and diagnostic messages. Unless you really know what you're doing, you shouldn't select this option.
Fail-safe Video Mode
|
If you have a very old graphics card (non VESA-2 compliant), the Select fail-safe video mode option won't appear in the Boot Loader's main menu. |
The Select fail-safe video mode option lets you set the video mode—or screen resolution—that's used if your graphics card isn't supported or if you're running in "safe mode", as explained in the previous section. (If your monitor only displays in grayscale, then your card probably isn't supported; you know when you're running in safe mode since you had to explicitly choose it.)
After selecting Select fail-safe video mode, you'll see a list of screen resolutions in the form width x height x bits per pixel. As examples: 800x600x16 and 1024x768x16. Choose a setting that's reasonable for your monitor, but keep in mind that higher resolutions slow down your system. (The Standard VGA setting, near the top of the list, is the grayscale mode).
After you choose a resolution, return to the main menu and continue booting. Your system won't be as fast as it would be if the BeOS had a driver for your card, but it will be faster (and will look better) than running in grayscale.
Booting on PPC
You set the boot volume—your choice of a disk or partition to boot the BeOS from—during installation. There are two ways to change your boot volume after installation: by using the Boot preference application, or in the boot menu screen.
Boot Preference
The Boot preference app lets you select the volume from which you launch the BeOS. This is meaningful only if you have the BeOS installed on more than one partition. See Setting the Boot Volume in Customizing the BeOS .
Boot Menu Screen
You can also change the boot volume in the boot menu screen. To see this screen, you need to interrupt the boot sequence by double-clicking the BeOS Launcher and immediately holding down the Control key.
The boot menu screen looks like this:
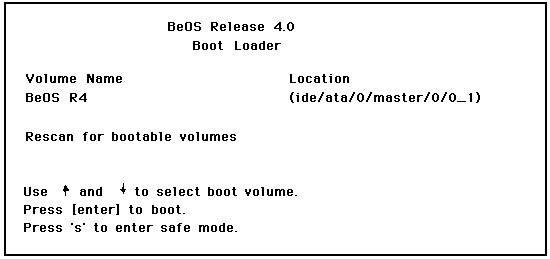
The screen lists each bootable volume by its device name and by its volume name. Use the arrow keys to select a boot disk and press Enter to make the selection take effect. The boot process then continues.
Shutting Down the BeOS
Before you turn off the computer you should shut down the BeOS to give applications a chance to clean up after themselves.
- Save files you are currently working in.
 Click on the Be logo in the Deskbar to bring up the Be Menu,
then choose Shut Down (or Restart).
Click on the Be logo in the Deskbar to bring up the Be Menu,
then choose Shut Down (or Restart).
- If there are tasks in progress (copying or moving files, emptying the trash, etc.), a dialog asks
you to confirm the shut down when they are complete.
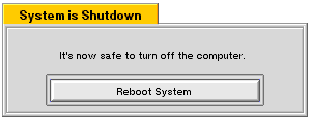
- Eventually, you'll see a message that it's safe to turn off the
computer. Do so—or click the Reboot System button to restart
(If you chose Restart from the Be Menu,
this message does not appear.)
Resetting the BeOSIf your computer crashes, you'll need to restart or "reset" the BeOS:
- BeOS for Intel. Press Control+Alt+Delete.
- BeOS for PPC. Press Control+Command+Power On.
- On a BeBox (or other hardware). Press the Reset and Interrupt buttons. Check your computer's user manual for the location of these buttons.

CAUTION: If you reset the computer without choosing Restart or Shut Down first, you risk losing data. In particular, you'll lose changes made to documents since you last saved them.
Getting to Know the BeOS Workspace
Familiarize yourself with the Be workspace as it appears in this screen:
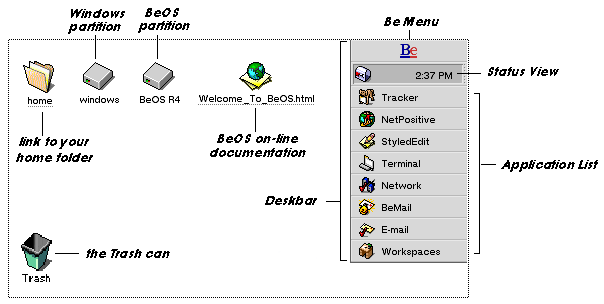
Appearing on the desktop when you boot the BeOS:
- An icon that represents the BeOS partition that you installed on your hard drive. This is where the Be file system lives.
- An icon representing the Windows or Mac partition of your hard drive. You can read and write the files on this "foreign" partition, but you can't run Windows or Mac applications.
- A link to your home folder. This contains, among other things, a query folder for system queries you generate with the Find feature, a mail folder, and a SampleMedia folder with test files to use with applications.
- Welcome_To_BeOS.html takes you to the online documentation.
- The Trash icon. This is where you drag files that you want to dispose of.
- The Deskbar, which is explained in its own section below.
Like most operating systems, the BeOS presents documents (and other data) in windows, and lets you operate on the data through direct manipulation (typing, cut/copy/paste, etc.) and through the use of menus. Before looking at specific parts of the BeOS, such as the Deskbar and Tracker, we'll glance at how windows and menus look and behave on the BeOS.
A Look at BeOS Windows
The windows that the BeOS presents are similar to those of other operating systems. For one thing, they're square. And you can move them, resize them, close them (and so on), using techniques that should be familiar to anyone that's touched a computer in the last ten years. This section provides a very brief look at a typical BeOS window, and tells you how to manipulate it.
Be windows look like this:
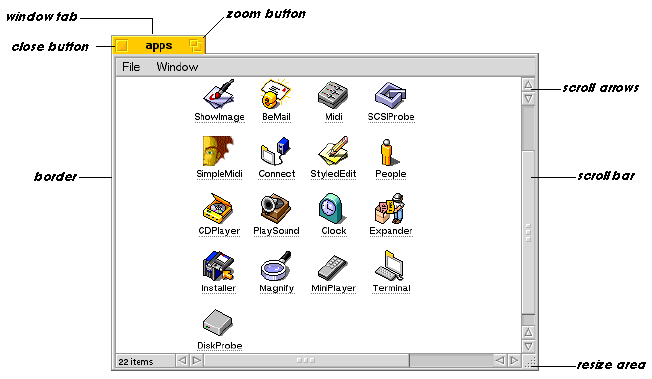
- Moving and Resizing. To move a window, drag it by its tab or border. To resize it, grab the resize area and drag. On windows that have scroll bars, the resize area is the square between the scroll bars (as shown above); on other windows, it's simply part of the window's border.
- Zooming. You can also resize a window by clicking its
zoom button. This resizes the window so it's big enough to display
everything it contains (without spilling off the screen). Click the
zoom button again to return the window to its previous size and location.
- Hiding and unhiding. To hide a window, double-click its window tab anywhere except in the close or zoom button. When a window is hidden, its icon in the application's Window List (in Deskbar) is gray; to unhide the window, click on the grayed-out icon. (The Window List is described and illustrated later in the The Deskbar, later in this chapter.)
- Closing. You close a window by clicking the close button. For most applications, closing the app's final window automatically quits the app.
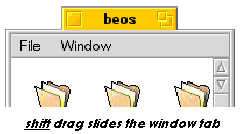
- Sliding the window tab. A unique feature of Be windows is that you can slide the window tab across the top of the window. You do this by holding down the Shift key and then dragging the tab.

The BeOS has a notion of an active window. Many windows can be open but only one window can respond to your actions, such as pressing keys on the keyboard. This active window is the one that's frontmost on your screen and has a yellow tab. (The tabs of all other windows are gray.) To make a window active, click its tab, border, or, for most windows, anywhere inside it. When you start up a new application or switch applications, the frontmost window in the new application is usually the active window.
NOTE: If you've used the Mouse preference to turn on Focus follows mouse, the active window will be whatever window the mouse is pointing to. In focus-follows-mouse mode, the active window may not be frontmost, but it will have a yellow tab.
Working with Menus
Menus are pop open palettes of commands. BeOS menus aren't much different f rom menus on other operating systems—if you've used a computer before, you shouldn't have any trouble using the Be menus.
This section describes the default look and behavior of Be menus. To customize the menus on your computer, see Menu in Chapter 5.
Windows and Menu BarsAlmost all windows have a menu bar, a grey bar at the top of the window that contains some number of menu titles. Click on a title and the menu it corresponds to pops open, displaying its commands. An arrow to the right of a command indicates a submenu. If a command title has an ellipsis ("...") at the end, it indicates that if you choose the command, an additional panel will appear.
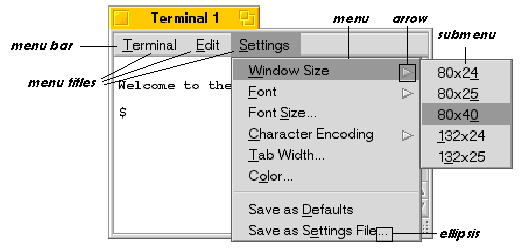
To select a command from a menu, simply click on it—the command is executed and the menus go away. To dismiss a menu without choosing anything, hit Escape. If you have submenus open, you have to hit Escape for each one.
The menu shown above was opened by clicking (i.e. pressing and releasing the mouse). You can also drag through a menu: Press on a menu title and drag through the menu, releasing the mouse when it's pointing to the command that you want. Submenus automatically open and close as you drag over them. To dismiss the menu(s) without choosing a command, simply drag the mouse outside the bounds of the menu and release.
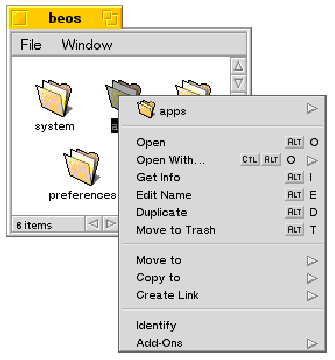
Context MenusMany items that appear on the desktop and in Be applications have context menus associated with them. A context menu is an object-specific menu that's displayed when you press (mouse-and-hold) on the object; it takes a moment for the menu to appear—long enough for the system to realize that you're not going to double-click the object. You can pop open a context menu immediately by pressing with the second mouse button, or by holding down Control+Alt when you press with any button.
An object that has a context menu doesn't give you any visual indication that the menu exists—you learn which ones do mostly by experience. Most objects presented by Tracker and Deskbar do have context menus. For example, if you press a file icon inside a Tracker window, you'll see this context menu:
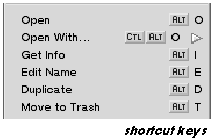
Shortcuts and TriggersBeOS menus can also be operated from the keyboard, through shortcut keys and trigger letters.
- A shortcut key is an Alt+letter combination that's
assigned to a specific menu command (or, on a Macintosh-based machine,
Command+letter). Some shortcuts specify additional modifier keys, such as Shift or Control. Pressing the keyboard shortcut when the menu is closed chooses that command. The shortcuts for a menu's command are shown along the right side of the open menu. Not every command needs to have an shortcut. Keep in mind that the shortcuts only work when the menu is closed.
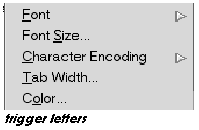
- A trigger letter is a single character that's assigned to a command. By pressing a trigger letter, you invoke the associated command. Trigger letters are underlined in a menu's title or in a menu item, and only work when the menu is open.
The Deskbar
The Deskbar is a roster of system services and applications. It contains Be Menu items, the Status View, and a list of all running applications. When you start the BeOS, the Deskbar appears in the upper-right corner of the screen. To move it to any of the four corners or to spread it across the top or bottom of the screen, grab the dotted border at the right of Status View. This is easier to see than to describe:
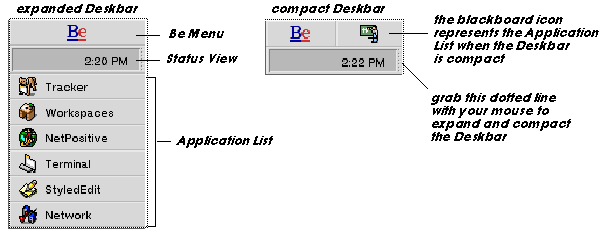
When it's lying along a side of the screen (as opposed to spread along the top or bottom), the Deskbar can appear expanded (the default) or compact. To compact the Deskbar, press the dotted line and drag up. When the Deskbar is compact, a blackboard icon next to the Be Menu represents the Application List. Clicking on the blackboard pops open the list of running applications.
The Be Menu
The Be Menu opens when you click the Be logo in the Deskbar. The Be Menu contains:
-
About BeOS. Basic system information and credits.
- Find. The system query application, described in detail in Finding Files and Folders in this chapter.
- Show/Hide Replicants. The replicants mechanism lets you "clone" views and drop them into other applications. The Show/Hide Replicants menu item displays or hides the replicant's handles, or draggers. See Replicants in this chapter for more information.
- Restart/Shut Down. These were described in Booting the BeOS, above.
- The folders listed at the bottom of the Be Menu comprise the "shortcut" list—folders and files that you want to keep at your fingertips. By default, the list contains the apps, preferences, and demos folders.
Status View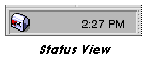
The Status View initially shows the time. Click on the time and it changes to the date. To set the Time preference, see Time and Date in Chapter 5.
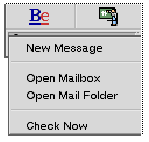
Certain system services add icons to the Status View to tell you that they're running, and to give you access to their menus. For example, the mailbox icon shown above is added by the mail daemon (the background service that sends and delivers e-mail). Clicking on the mailbox icon pops up a list of mail commands (the commands themselves are examined in a later chapter).
The Application ListThe Application List shows all currently running applications. The application is always visible in Deskbar's expanded form; when Deskbar is contracted, you pop open the list by clicking the blackboard icon. Clicking on an application in the list "activates" that application and brings one of its windows to the front of the screen.
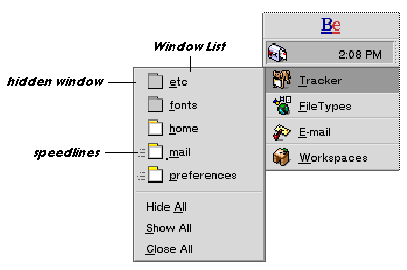
Each application has its own Window List which you can see by clicking and holding the app's icon. The Window List lets you select individual windows, and also lets you show, hide, and close all windows in an application
Windows that are hidden are grayed out; click on the gray icon to make the window reappear on the desktop. "Speedlines" next to a window icon indicate that the window is in a different workspace than the current one; clicking on the icon takes you to that workspace.
Working with the Tracker
The Tracker application is the BeOS file system navigation and file management interface. Tracker's windows present the contents of individual folders. The next sections explain how Tracker windows are set up (Looking at Tracker Windows), how to use the windows to navigate the file system (Navigating in Tracker Windows), and explore some of the things that Tracker lets you do to files and folders (Tracker Basics).
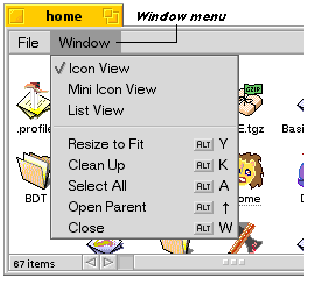
Looking at Tracker WindowsWhen you double-click a folder, a new Tracker window opens on the screen. The window can display its contents—the files and folders it contains—as icons, mini-icons, or as a "list view." You change modes by choosing an option from the Window menu.
Icon and Mini Icon View
In Icon View and Mini Icon View, you can move an icon within the window by dragging it to the location you want. If more than one icon is selected, they all move when you drag.
Some of the commands in the Window menu arrange the icons in a grid. Choose Clean Up to align each icon in the window to the nearest location in the grid. If you hold down the Shift key, Clean Up changes to Clean Up All, which sorts the icons in the window in alphabetical order.
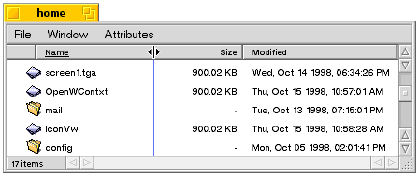
List View
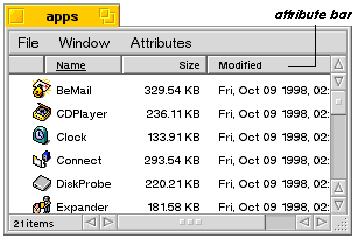
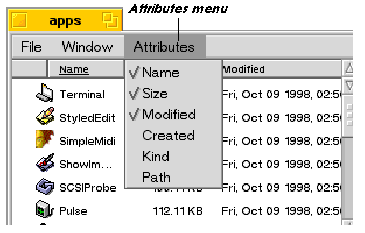
In List View mode, the Tracker window displays its contents in a vertical list, and additional facts, or attributes, are given for each item. The names of the attributes are listed in the window's attribute bar.
The window displays an Attributes menu. This menu lets you select the attributes you want to display. The full list of attributes depends on the type of files the window contains, but some common attributes (name, size, modification date) are available to all files. You can also pop open a copy of the Attributes menu by right-clicking in the attribute bar.
Moving and Resizing Attribute Columns
To change the order of the attributes, click on an attribute in the attribute bar and drag it to another location. You can resize an attribute's column by pressing and dragging the divider between two of them . A special cursor and a blue line indicate that you're in resize mode.
To move an attribute drag it where you want it; drag it out of the attribute bar to remove it.
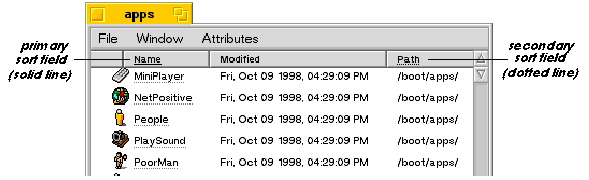
Sort Order
Initially, items in List View are sorted alphabetically by name—in attribute-speak, the "name" attribute is the primary sort field. If you click on an attribute it becomes the primary sort field and the items in the list are sorted accordingly. Also, the attribute you clicked is now underlined. To set a secondary sort field, Shift+click on another attribute. A dotted underline indicates the secondary field. Click a second time on either attribute to sort in reverse order.
Navigating in Tracker WindowsLike most modern operating systems, the BeOS is based on a hierarchical file system that uses the metaphor of folders (or directories) to help you organize and keep track of your files. Within the hierarchy, every folder has a parent folder. There are three ways to open the parent of the Tracker window that you're currently working in:
- By choosing Open Parent from the Window menu.
- By pressing Alt+up arrow.
- By using the path pop-up, as described below.
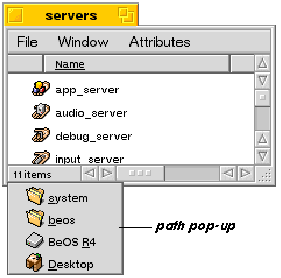
Click the lower-left edge of a folder window (the area that shows the number of items the folder contains). This displays the path pop-up, a list that describes the succession of nested folders—the "parent path"—to your current folder. You can open any folder from the path pop-up by selecting it.
If you hold down the Windows key when opening a parent folder, the original folder closes when the parent opens.
You can "descend" the file hierarchy simply by double-clicking a folder within your current Tracker window. This opens a new window for the "child" folder, in which you can double-click another folder, and so on. Again, if you hold down the Windows key while opening a new Tracker window, the old window closes.
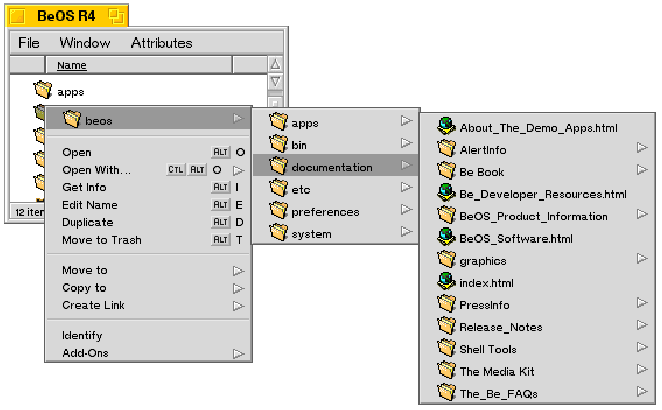
You can also descend the hierarchy by using the context menu that pops open when you press and hold the mouse on a folder icon. The context menu shows the standard File menu commands, plus, at the top of the menu, an item that represents the folder that you pressed the mouse on. Move the mouse over the item and another menu appears that shows the folder's contents. You can select a file or folder in this menu, or descend some more by moving your mouse over yet another folder, and so on.
For information on keyboard navigation of Tracker windows, see Keyboard Shortcuts in Appendix A.
Tracker BasicsSome of this information will already be familiar to you from other operating systems, but some is BeOS-specific.
Getting Information About an Item
To get information about an item in a Tracker window, select it and choose Get Info from the File menu. Most context menus also have a Get Info command.
The information you receive depends on the item: Disk information is about storage capacity and free space. File information is about size, creation, modification date, and location in the file system. For applications, you get this same information, plus a version number.
Renaming Items
To rename an item in a Tracker window, click on the name and type, or select the item and choose Edit Name from the File menu. You can use up to 255 characters—anything but a forward slash ("/")—and any name not already used in that folder.
If you change your mind about renaming a file or folder while editing its name, press the Escape key to restore the original name.
WARNING: Do NOT rename the /beos folder located on the boot disk or the BeOS will no longer work. Moving, Copying, and Linking
You can move items from one folder to another by dragging them into the window or onto the icon of the destination folder.
NOTE: If the destination folder is on a different volume, the item is copied instead of moved. If you want to copy an item rather than move it, hold down the Windows key while you drag the item. This forces a copy whether the destination is on the same volume or not. You can also copy an item (into the same folder) by selecting it and choosing Duplicate from the window's File menu. The duplicate has the same name as the original, but with "copy" appended. If you make multiple copies of the same item, "copy 2," "copy 3," etc., is added to the name.
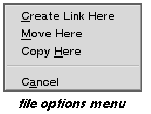
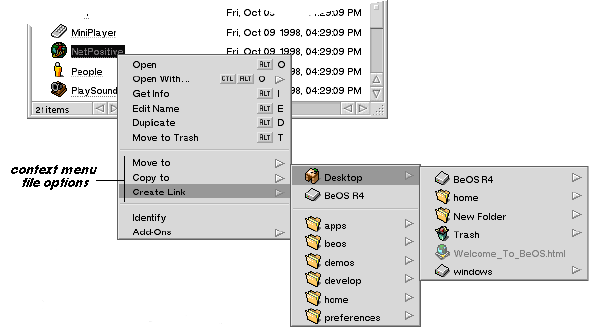
If you hold down the Control key when you're dragging a file or folder icon, you'll see the file options menu. Choose from one of the options to create a link to (which we'll explain in a moment), move, or copy the file (or cancel).
The context menu that you get when you press and hold on an icon presents a similar array of file options. In addition, it lets you navigate the file hierarchy to search for the destination folder at the same time.
If you're copying or moving a lot of files, a Status window shows the progress of the task. You can click the Stop button to stop a task in midstream, but whatever you've done so far is not undone.
Creating a Link

A link is a "dummy" file that points to an actual file or folder. The link file displays the same icon that represents the real item. To show that it's a link, the link's filename is underlined. A link is a handy way to create a shortcut to a file, folder, or application that you frequently use. You can put a link anywhere, but they often live on the desktop.
Deleting Items

You delete files, folders, and other items by dragging them into the Trash. You can also choose Move to Trash from the File menu or from object's context menu. You can also highlight an item and press the Delete key (not the backspace key). When the Trash can isn't empty, it displays rubbish.
Items in the trash aren't actually deleted until you empty the trash. If you decide not to delete something, double-click the Trash icon and drag it out of the Trash window that opens up.
When you want to remove items permanently, choose the Empty Trash command from the File menu in the Trash window, or from the Trash icon's context menu. You should empty the trash periodically, because eventually it can take up a lot of disk space.
Tracker Add-onsA Tracker "add-on" is a program that operates on files that are selected in a Tracker window. Add-ons can be added to the system at any time—they're a way of adding functionality to Tracker that wasn't included when it was written. TrackerTracker add-ons appear in the File > Add-Ons menu, and in a file's context menu.
Three Tracker add-ons come with the BeOS: Backgrounds and FileTypes, which are explained in the Preferences chapter, and Zip-O-Matic, explained below.
There are also many third-party Tracker add-ons (along with third-party application add-ons) available from BeWare for doing such things as viewing archives, expanding and compressing files, viewing file attributes, searching file contents, and so on.
Zip-O-Matic
Zip-O-Matic lets you archive multiple files into a single compressed zip file.
- In a Tracker window, highlight the files or folders you want to compress.
- Right-click on any of these files to open a context menu.
- Highlight Add-Ons (at the bottom of the menu) and click Zip-O-Matic; a status window shows the progress of creating the archive.
You can also use Zip-O-Matic from the desktop:
- Right-click on the desktop to bring up a context menu.
- Choose Add-ons > Zip-O-Matic.
- A Zip-O-Matic window pops up; drag the files that you want to compress onto the window.
Replicants
A replicant is a component of an application that you can "clone" so that it resides inside another application. To replicate an item, open the Be Menu in the Deskbar and choose Show Replicants. This creates hand-like draggers on items you can replicate. Grab by the dragger to place the replicant anywhere you want, including the desktop.
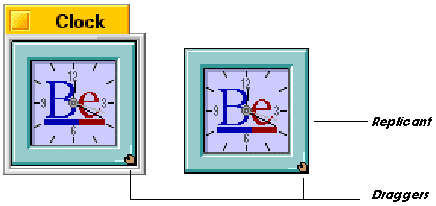
Currently, you can replicate the Clock application and NetPositive web pages. For more on web page replicants, see "NetPositive as a Replicant—Live Desktop Pages in chapter 4.
To delete a replicant, right-click on the dragger; a pop-up menu gives you the option to delete.
Taking a Screen Shot
There are two ways to take a screen shot in the BeOS:
- Press Print Screen
- Press Alt+Shift+3.
The screen shot appears in the /boot/home folder on your boot disk. All screen shots are in targa format. You can open the screen shot by double-clicking the file or by dragging it onto the ShowImage application.
Mounting Disks
Mounting disks makes their contents available to the operating system. Use the Mount command in the desktop context menu or in the context menu that appears when you press on the icon of any mounted volume. In both context menus, all available disks appear in the Mount menu pop-up; disks that are already mounted have a checkmark beside them. Both menus also give you the option of mounting all attached disks with the All Disks command.
If you click Settings, you'll see the Disk Mount Settings panel, which lets you specify automounter settings—which disks you want mounted on your desktop.
Finding Files and Folders
You use the Find command in the Be Menu to search for files, folders, and other items in the Be file system. You can also search for such things as e-mail.
When you double-click Find (or type Alt+f when a Tracker window is active), the Find panel opens; there you specify the attributes of the thing you're looking for.
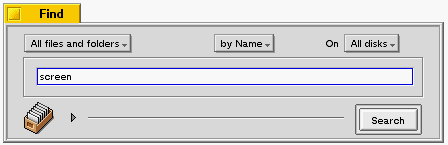
The Find panel shown here is prepared to search for any file or folder that has the word "screen" in its name. The search is performed on all disks (including Mac or Windows volumes). Click the Search button and a window opens and starts to fill with items.
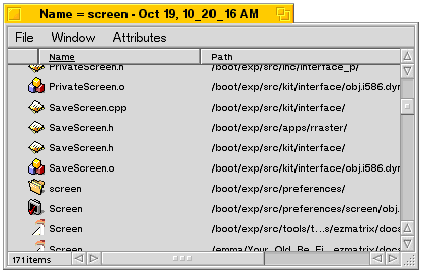
As shown here, the window (a Query Result window) looks a lot like a Tracker window, except the background is gray, and it only works in List View. (In fact, the window is created by Tracker.) You can double-click the files and folders that are listed in the window, move them, copy them—you can do just about anything you would do in a "normal" Tracker window.
The Find panel lets you modify your search, or query, in these ways:
- The top-left pop-up lets you choose the type of item you want to find ("All files and folders", "E-mail", "Bookmark", etc.)
- The center pop-up lets you choose one of three search techniques: You can search by name, by attribute, or by formula. The attribute search is the most powerful—it lets you ask for files of a certain age, size, and so on. The formula search, in which you type in a logical expression (such as name="*screen*") is the most flexible, but is also the clumsiest and hardest to understand.
- The right pop-up lets you restrict your search to a particular volume.
Toggle the Find panel's little grey arrowhead, and you'll see more choices.
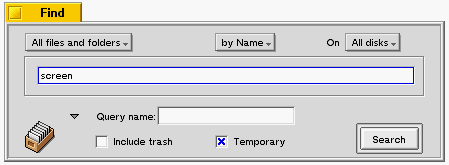
- The Query name: field lets you name the query that you're creating so you can run it again later. You don't have to name your queries—usually you only do this for queries that you run by habit. For example, if you regularly check your disk for large files, or for e-mail of a certain age (so you can prune it), you would want to name these queries.
- The Include trash checkbox tells the Find mechanism to rummage through the Trash can. By default it avoids that rubbish.
- Checking the Temporary check box means your search results will be saved only for a certain system-set period of time. If you want to save your query uncheck Temporary.
Saving and Editing QueriesThe "file drawer" icon in the lower left corner of the Find panel represents the current query. If you want to save the query so you can run it again later, drag the drawer icon and drop it in a folder or on the desktop. To re-run the query you double-click the drawer icon that you dragged and dropped.
(Note that queries are also automatically saved as files in the home/queries folder.)
To edit a query, select a query file (from the folder or desktop you dropped it on, or from home/queries) and select File > Edit Query from the Tracker menu bar or the file's context menu. This brings up the Find panel filled in with the query's criteria; you can then change the criteria. The Query Result window also has an Edit Query item in its File menu. This lets you bring back the Find panel for a query that you've just run.
To delete a query, drag it into the trash, just like any other file.
The Be User's Guide,
for BeOS Release 4.5.Copyright © 1999 Be, Inc. All rights reserved.
- BeOS for Intel. Press Control+Alt+Delete.