web publishing for Enterprise Server
Configuring web publishing
As the server administrator, you can set many options that define how web publishing works for your server clients and how your server's web publishing data is maintained:
- set up Netshare and create Netshare home directories for your users
- set access control for Web Publisher owners
- create and maintain searchable data
- turn web publishing on and off
- set the web publishing language
- maintain web publishing data
- turn off all or part of link management
- define the version-control archive
- unlock files
- add custom file properties
- manage web publishing properties
- customize the Netshare interface
- customize the Web Publisher user interface
- http://yourServer/publisher
The online help system is also available through user components such as agent services, search, and Web Publisher. To access the help system, you can use the Help menu command in Web Publisher, or you can click the Help button on one of the search interface forms, on the Agent Services page, or on the Web Publisher Services page.
Using Netshare
Netscape Netshare provides a Netscape Enterprise Server user with a personal
home page from which they can store, share, and manage their server documents.
Netshare is a convenient starting point for using the Netscape Enterprise
Server user services: Web Publisher, agents, and search. From their home
page, users can also obtain information about how they are defined in the
server's user directory, such as their name, password, and telephone extension.
To access a user's default Netshare home page, the user types in this URL:
http://yourServer/netshare/yourUserIDAfter authentication, the user's default Netshare home page is displayed with a set of links to many server functions:
- Web Publisher: Users have direct access to the files and folders in their home directory.
- Access control: Users can restrict access to their home directory.
- Check links: Users can check the links in their home directory.
- Agents: Users can manage their agents on the server.
- Search: Users can search on any collection set up for their server.
- User info: Users can review and modify their user information.
- User's Guide: Users can look at Netshare online help.
Setting up the server and creating Netshare home directories
As the server administrator, you need to configure Netshare for your server
and for your server's users before they can use Netshare. Once you have
set up Netshare, you need to create a Netshare home directory for any user
or group who wants to use Netshare. Netshare provides two types of
interface for server administrators: Server Manager forms (Set
Up Netshare and Create Netshare)
and a netshare command-line
utility.
This section on using Netshare covers these topics:
- Using the Server Manager
forms
- The Set Up Netshare form (modifying
the values in the configuration file)
The Create Netshare form (creating Netshare home directories)
Before you start
Before you set up Netshare for your users, you need to be sure that the
Web Publishing functions are turned on for your server, that you understand
how Netshare's default naming conventions operate, what the configuration
file contains, and what it means to mark as user as licensed.
Server features that must be enabled
In order to use the functions of Netshare fully, including Web Publisher, link management, agents, and search, each of these functions must be turned on for your server. By default, they are all enabled, but you may wish to verify their state.To check the state of Web Publisher, follow these steps:
- From the Server Manager, choose Web Publishing.
- Click Web Publishing State.
- From the Server Manager, choose Web Publishing.
- Click Link Management.
- From the Server Manager, choose Web Publishing.
- Click Web Publishing State. (This must be on.)
- From the Server Manager, Agents & Search.
- Click Agent Management. (Agents must be enabled.)
- From the Server Manager, choose Agents & Search.
- Click Search State.
Netshare directory naming conventions
To facilitate handling large quantities of individual home directories for every Netshare user, a naming convention has been defined. Its format is <doc-root>/<netshare directory>/<home directory>. The default is to use the primary document directory for your server (<server>/docs), to use /netshare as the Netshare directory, and to use the user's User ID as the home directory's name. Thus, on a default Windows NT installation for the user JDoe, the Netshare user's home directory would created be at C:\Netscape\SuiteSpot\docs\netshare\JDoe.As server administrator, you can select one of the additional document directories defined for your server as the document root, and you can define different directories for the Netshare and home directories. If you change these values on the Server Manager Set Up Netshare form, the configuration file is changed to reflect your changes, and all home directories added subsequently use the new directory values. If, however, you use the netshare utility to indicate different directories, the configuration file is not changed, so only the user directories currently being added are affected.
One situation in which you might want to change the default directory path is when you want to create a home directory for a user that does not map to their user ID. For example, the user JDoe wants an additional Netshare directory called Project1. In this case, the user ID would be JDoe and JDoe would be assigned as owner of the Project1 directory.
The Netshare configuration file
Netshare uses a configuration file, netshare.conf, that contains the following data:- Document root
- Netshare parent directory
- Template filename
When you use the Set Up Netshare form to change a default directory or template file, you are updating the values in the configuration file. From then on, any home directory that you create uses the new values.
Marking users as licensed
In order to create a Netshare home directory for a user, the user must be marked as having been granted a Client Access License for a Netscape Enterprise Server.- Note
After your server is installed, before being able to mark a user as licensed, you need to go to the Set Up Netshare form (by clicking the Web Publishing button in the Server Manager). Displaying this form causes an essential modification to an internal configuration file. You need only do this one time after the server is installed.
- For a new user, mark the licensing as part of creating a user by following these steps:
- From the Administration Server, choose the Users & Groups function.
- On the New User form, enter the user's information.
- Click Create and Edit User
- Click Licenses.
- Check the checkbox labeled "Netscape Enterprise Server" and click Save Changes.
- as part of creating an individual Netshare home directory through the Server Manager form
- as part of creating an individual Netshare home directory through the netshare utility
- by following these steps:
- From the Administration Server, choose the Users & Groups function.
- On the New User form, click Find. (Use wildcards as necessary to define your search.)
- On the form listing all matched user IDs, click the desired user ID.
- On the user information form, click Licenses.
- Check the checkbox labeled "Netscape Enterprise Server" and click Save Changes.
Access control for Netshare
When you create a Netshare home directory for a user ID, the server assigns
the user as its owner and the user is the only one who can write to the
directory. Other users can read the user's files, but cannot make any changes
to them unless the user explicitly provides such access permissions.
The default access permission is to allow anyone defined as a valid server user to read any Netshare directory, but only the designated owner of the Netshare home directory can modify the files.
This is the default ACL that is applied to the Netshare parent directory:
allow (all) user = 'owner';When you create a Netshare home directory for a group, the server assigns ownership of the files and folders in that directory to the owner's user ID. This also gives all users in the group read-write access permission for all files and folders in the home directory. Because this requires creating a new ACL rule for this particular group, this forces the server to restart to pick up the new ACL information.
Using the Server Manager forms
You can use the Set Up Netshare and Create Netshare forms that are available through the Server Manager. These provide a more accesible interface for updating the Netshare configuration file and creating Netshare home directories.The Set Up Netshare form
The Netscape Enterprise Server user interface available through the Server Manager provides the Set Up Netshare form that you can use to modify the Netshare configuration settings. You can change some of the Netshare configuration information for your server and the configuration file is updated with your changes. When you have set up Netshare for your server, you can create Netshare home directories for your users.To change the values in the configuration file, follow these steps:
- From the Server Manager, choose Web Publishing.
- Click Set Up Netshare.
- Enter the new directory or template file values:
- Netshare document root
- Netshare parent directory
- Name of template file
Choose from the dropdown list of document directories defined for your
server to change which is to be the document root for Netshare. This is
where the Netshare parent directory and all the individual Netshare home
directories are to be placed. The list displays the physical pathname for
each document directory.
The path for the Netshare parent directory that is to contain the individual
Netshare home directories. By default, this is /netshare, so when
you create the default Netshare home directory for a specific user, it
is named the /netshare/<userID> directory. If any directory
in the path does not exist, Netshare creates it for you.
The file that contains the names of the template files used in creating
the Netshare home pages. The default is the netshare.lst file,
which is located in the <server-root>/bin/https/admin/html
directory.
The Create Netshare form
There are three choices for creating Netshare home directories from the Server Manager: for an individual user, for a specified group, or for all users who have been marked as licensed. The last choice is particularly useful for server adminstrators who wish to add Netshare home directories for all existing users.Note: You must have already set up Netshare for your server before you can create Netshare home directories and Web Publishing must be enabled before your users can use Netshare.
To create a Netshare home directory for a single user, follow these steps:
- From the Server Manager, choose Web Publishing.
- Click Create Netshare.
- Click the "A single user" radio button.
- Enter the user's user ID.
- Ignore the Owner field.
- [Optional] Enter another Netshare home directory if you do not want to accept the default of using the user ID.
- Click the Create button.
This marks the user as licensed if not yet marked as such, creates the user's Netshare home directory, and assigns ownership of the files and folders in that directory to the user ID that was entered. If you attempt to create a home directory that already exists, you receive an error message.
- From the Server Manager, choose Web Publishing.
- Click Create Netshare.
- Click the "A group" radio button.
- Enter the name of the group.
- Enter the name of the group's owner. This must be a valid member of the group.
- [Optional] Enter another Netshare home directory if you do not want to accept the default of using the group name.
- Click the Create button. This restarts the server because you have added a new ACL, granting special access to the members of the group. When you add a single user's Netshare, the default ACL is sufficient.
This marks the group's owner as a licensed user if not yet marked as such, creates the group's Netshare home directory, and assigns ownership of the files and folders in that directory to the owner's user ID. This also gives all users in the group read-write access permission for all files and folders in the home directory. If you attempt to create a home directory that already exists, you receive an error message.
- From the Server Manager, choose Web Publishing.
- Click Create Netshare.
- Click the "All users marked as licensed" radio button.
- Click the Create button.
This searches through the local or LDAP user directory for your server and creates a Netshare home directory for each user who has been marked as licensed but who does not yet have a Netshare directory. If you attempt to create a home directory that already exists, you receive an error message.
Note: You can use the netshare utility (the -l option) to perform a batch update, marking all users as licensed, before using this form.
The netshare command-line utility
Server administrators can use the netshare command-line utility to define the Netshare configuration settings, create Netshare home directories for an individual user or for a batch of users, and display the online help.Several values are defined in the configuration file. See the section on syntax for details. To accept the default values from the configuration file, skip these command-line options. (Some examples of how you can use netshare are provided for your convenience.) When you enter a different value for an option, it only applies to the home directory or directories being created at that time. If you want to modify the configuration file, you must use the Server Manager form or use your local text editor to edit the configuration file manually.
You can use the netshare command-line utility to:
- create a Netshare home directory for an individual user
- create a Netshare home directory for a group
- create Netshare home directories for all users marked as licensed
- mark all users as licensed
When you use the netshare utility to create a Netshare home directory for a group, the server marks the group's owner as a licensed user if not yet marked as such, creates the group's Netshare home directory, and assigns ownership of the files and folders in that directory to the owner's user ID. This also gives all users in the group read-write access permission for all files and folders in the home directory.
When you use the netshare utility to create Netshare home directories
for all users at once, the server searches through the local or LDAP
user directory for your server and creates a Netshare home directory for
each user who has been marked as licensed but who does not yet have a Netshare
directory.
Syntax of the netshare utility
netshare -a -l -s server_name -r server_root -u user_ID [-g group -o owner -d dir_name -v -H]Required fields: You must provide the name of your server instance and the path for your server root so that the utility can locate the appropriate configuration file for your server. You must use either the -a (all users) or the -u (single user) option to indicate which user directories you want to create.
| -a | Creates Netshare home directories for all users that are marked as licensed. |
| -l | Marks all users as licensed. |
| -s server_name | Indicates the name of the Enterprise Server you are currently configuring for Netshare. |
| -r server_root | Specifies the Netshare server root. |
| -u user_ID | Identifies the user ID to assign as the owner of the Netshare home directory, marks this user ID as licensed if it hasn't already been marked, and creates a home directory with this user ID unless the -d option has also been used. |
| [-g group] | Creates a Netshare home directory for this group ID unless the -d option is also used. Defines an ACL for the Netshare home directory being created that provides read-write permission for each user in the group. You must also use the -o option because a user ID needs to be assigned as the owner of the group's Netshare home directory. |
| [-o owner] | Identifies the user ID to assign as the owner of the Netshare home directory that is being created for a group, and marks this user ID as licensed if it hasn't already been marked. This field is required if you use the -g option. |
| [-d dir_name] | Specifies a name for the Netshare home directory that overrides the default name, which is the user ID or group ID. If the directory does not exist, Netshare creates it for you. |
| [-v] | Displays progress information as the operation proceeds. |
| [-H] | Displays the online help. |
Examples of using the netshare utility
netshare -u JDoe -s moray -r /export/ns-home(For the server moray, creates a Netshare home directory called /JDoe, assigns JDoe as its owner, and marks the user as licensed if not yet marked.)
netshare -l -a -s churchill -r /export/ns-home(For the server churchill, marks all users as licensed and then creates a home directory for each user, assigning them ownership of their own Netshare directory.)
netshare -g Marketing -o JDoe -d mktg1 -s iguana -r /export/suite-spot(For the server iguana, creates a home directory called /mktg1 for the Marketing group, with JDoe assigned as owner.)
netshare -u JDoe -d Project1 -s sylvester -r /export/enterprise(For the server sylvester, creates a home directory called /Project1 for JDoe .)
Setting access control for Web Publisher owners
The access control system supports a special user called owner. When an ACL rule designates the user to be the owner, the permissions defined by this rule apply to the owner assigned by Web Publisher for each document. For example:allow (write, delete) user = owner;
Note
Do not create a user with the username of owner.Ownership of web publishing documents can be assigned either through the Web Publishing|Index and Update Properties form or through Web Publisher. The Index and Update Properties form allows you to do a bulk assignment of ownership to a set of documents and Web Publisher performs individual assignments of file ownership to a user when the user publishes or uploads the file.
Only the owner can modify the access control (ACL) rules for a file. These rules define the actions users can perform on the file, such as moving, copying, renaming, or deleting it. An owner can reassign ownership of a file to another user, and if a file has no owner, anyone with a valid username can identify themselves as its owner. Because the username identified as the owner of a file can change, any access control that you place on a file should target the owner of a file rather than a specific username.
If the default access control (ACL) that governs your server is not restrictive or flexible enough for your web publishing needs, you can use the Server Preferences|Restrict Access function to create an ACL that is more appropriate for web publishing.
For example, you could create an ACL like this:
acl "uri=/publisher/";
allow (read, execute, list, info) user = anyone;
allow (write, delete) user = owner;
This ACL sets a restriction such that only the owner of a file within the additional document directory of /publisher can modify or delete the file.
See Chapter 6, "Controlling access to your server" for more information about setting access control.
- Note
If you expect web publishing users to publish documents to a directory, you need to set the Unix file permissions to give them write access to that directory. You should also disable write permissions for directories you do not want them to publish to.
Indexing and updating properties
Before users can perform a search across a set of documents and directories, information about the documents and directories needs to be indexed into the web publishing database. The web publishing database is stored as a search collection and is created as part of the server installation process. Initially it contains no data and must be populated by indexing the documents in the document directories.The Web Publisher window lists the files and folders that are in the document directory selected when a user starts up Web Publisher, but the data initially is not indexed (and therefore is not available for searching) and the files have no owners (so anyone can define their username as the owner of a file, and thereby be able to set the access control for a file).
You can use the Index and Update Properties form
to perform bulk indexing of documents to create searchable web publishing
data and you can also use it to do a bulk assignment of owner for the files
included in the collection. You can restrict or expand the scope of documents
and directories to be indexed, and you can index just the file properties,
called metadata, or you can also index the documents' contents.
If you choose to index the contents of the files, you can search on any
word in the documents although publishing and uploading files with Web
Publisher may be slightly slower.
- Note
- From the Server Manager, choose Web Publishing.
- Click the Index and Update Properties link.
- The Document Directory field displays the currently selected directory.
- To also index the subdirectories within the specified directory, click the Include Subdirectories checkbox.
- You can index all files in the chosen directory by leaving the default *.* pattern in the "Include files matching pattern" field or you can define your own wildcard expression to restrict indexing to documents that match that pattern.
- If this is the first time you index web publishing documents, check the "Index unindexed documents" checkbox.
- You can make a change to files that have already been indexed.
- You can do a bulk assignment of ownership to all files that match your criteria.
- To index the document content, check the "Index document contents" checkbox. You can choose to index the documents' contents as well as their file metadata.
- Click OK to begin indexing and updating web publishing.
Using this function clears the link status database of all current link checking information. You must recheck your links after indexing files.
You can index documents in the primary document directory, an additional document directory, or in a subdirectory. If you want to index a different directory, click the View button to see a list of directories. You can index any directory that is listed or you can view the subdirectories in a listed directory, and index one of those instead. Once you click the index link for a directory, you return to the Index and Update Properties form and the directory name appears in the Document Directory field.
Note
You can index the contents of your users' files and folders that are
in their default user home directories as defined by the Content Management
| User Document Directories function.For example, if user document directories
are active on your server and the default ~USERNAME/public_html
has been defined for your server, that entry is displayed as one of the
permitted document directories you can index. This indexes all user document
directories that exist currently on your server according to the criteria
you select in the Index and Update Properties form.
Note
You cannot use this function to index files that are larger than 3MB in size. You can, however, do an automatic indexing of such large files through the Property Sheet in Web Publisher (through the Web Publisher View|Properties menu command) by checking the "Make contents searchable" checkbox.
For example, you could enter *.html to only index the content
in documents with the .html extension, or you could use this pattern
(complete with parentheses) to index all HTML documents:
(*.htm|*.html)
You can define multiple wildcards in an expression.
See Chapter 3, "Managing your
server" for details of the syntax for wildcard patterns.
In subsequent indexing operations, you can uncheck it or you can leave
it checked to index any new documents that have been added to the document
directory.
For example, you can use the "Update previously indexed documents" option
to do a bulk ownership assignment or to index the content of files that
did not have this option set when they were first indexed. These options
are useful when you change many files at once. You can use the Web Publisher
client to index and update individual files.
To do this, check the "Set document owner to" checkbox and type in a
username. Be sure to type in a valid username because the server does not
perform any validity checks on the name. This updates the owner property
in each file's collection entry.
Note
Once you have indexed documents into the web publishing collection, don't change any document directory's URL mapping or the collection's entries will target the URL mapping to the wrong physical file location. If you have to change a document directory, you need to reindex the documents in the new location. You can use the Repair function to remove the indexed data from the old directory mapping.
Changing the web publishing state
You can deactivate web publishing and you can turn it back on. If you turn off web publishing, you also turn off link management. Documents that are subsequently moved or renamed may have incorrect links, and the link status database may not be up to date. The solution is to use the Web Publishing|Link Management function to manually turn link management off and then turn it back on again. This starts the link management function up again with an empty link status database. See "Changing the link management state" for more details of link management.Note
If you turn web publishing off, all agents for the server are also turned off and clients cannot use Netscape Web Publisher to access agent services. When web publishing is turned back on, agents that were turned off solely because web publishing was turned off are turned back on. Agents that were disabled for other reasons are still disabled.To change the web publishing state:
- Select your server on the Server Administration page.
- From the Server Manager, choose Web Publishing.
- Click the Web Publishing State link.
- To turn web publishing on, click the On radio button. To turn it off, click the Off radio button. The default value is On.
- Click OK to change the state of web publishing on your server.
Setting the web publishing language
You can change the web publishing language to any language supported by the user's installation, and these are listed for the server administrator in a drop-down list on the form.Note
Be cautious when using this function. If you change the language of a collection, the system deletes all the existing data in the collection.
- From the Server Manager, choose Web Publishing.
- Click the Web Publishing Language link.
- Select a language from the drop-down list. The default is English.
- Click OK to set the language.
After you change the web publishing language, your server is automatically restarted to apply the change.
Maintaining web publishing data
Web Publisher maintains multiple sets of data about the documents that are in the web publishing collection. When all web publishing data is synchronized, each file in the chosen document directory has a record in the web publishing collection and every property record in the collection has a corresponding file in the document directory.Although you can limit the scope of the Repair and Report functions to checking only the files in a particular document directory for collection records, every property record in the collection is checked for a corresponding source document regardless of which directory the file might be in.
Occasionally, these can become out of synch. You can obtain a report on the state of your web publishing files, and then repair one or more directories as needed. For example, if a document that was indexed into a collection is deleted, there is a record in the collection that no longer has any corresponding source document. Repairing removes the collection records for any such document.
You can perform these functions to maintain your web publishing data:
- Report on the collection's data
- Repair the collection
- Optimize the collection
You can produce a report on the current logical consistency of the web
publishing collection's data. This lists all the files in the selected
document directory and also lists all the records in the web publishing
collection, regardless of which directory the collection data corresponds
to. The report indicates which files are not yet indexed (and therefore
don't have records in the web publishing collection) and which records
have no source document (and therefore should be repaired). The report
highlights errors and indicates what the result of the repair would be.
For example, "Repair will delete Properties Record."
The report provides a short summary at the end
of the log file, indicating how many directories and files have been checked,
how many repairs are recommended, and how many errors have been encountered.
You can repair the web publishing collection's logical consistency.
This function repairs the files in the selected document directory and
produces a report similar to that from the Report function. The Repair
function indicates on the report which repairs have been completed and
what the repair accomplished. For example, "Repair: Removing Properties
Record."
You can optimize the web publishing collection to improve performance if you frequently add, delete, or update documents or directories in your collections. An analogy is defragmenting your hard drive. Optimizing is done automatically when you reindex or update a collection, so you should not need to do additional optimizing. One situation when you might want to optimize a collection is just before publishing it to another site or before putting it onto a read-only CD-ROM.
- From the Server Manager, choose Web Publishing.
- Click the Maintain Web Publishing Data link.
- You can define the scope of the Repair and Report functions by choosing the document directory to check through. If you want to use a different directory, click the View button to see a list of directories. You can report on or repair any directory or subdirectory that is listed.
- To also report on or repair the subdirectories within the specified directory, click the Include Subdirectories checkbox.
- To report on the collection, click the Report button. This reports on the selected document directory.
- To repair the collection, click the Repair button. This repairs inconsistencies in the selected document directory.
- To optimize the collection, click the Optimize button. This optimizes the entire web publishing collection.
Once you click the link for a directory, you return to the Maintain Web Publishing Data form and the directory name appears in the Document Directory field.
Changing the link management state
At times, you may not need automatic link checking and updating. At these times, you can turn link management off to conserve resources and to improve searching and indexing performance. When you turn link management off, Web Publisher stops doing automatic link checking and you cannot use the Check Links function from the Web Publisher Services page.You can also use this form to selectively turn the automatic link update feature on and off. When automatic link updating is on, Web Publisher changes the outgoing and incoming links in a file to keep them up to date as files are moved and renamed in Web Publisher. Because this revises the modification date for any file that has updated links, this feature is off by default.
Note
The automatic link update feature only affects links outgoing to or incoming from moved or renamed files. It does not affect HTML files that are being uploaded or published. Provided that link management is on, the links in these files are always updated as part of the upload or publish operation.For further information about link management in Web Publisher, access the online Netshare & Web Publisher User's Guide through the Help menu command in Web Publisher or the Help button on the search interface, the Agent Services page, or the Web Publisher Services page.
- Stop your server. Use the Server Preferences On/Off form or simply click the green light ON indicator for your server instance at the Server Administration page.
- From the Server Manager, choose Web Publishing.
- Click the Link Management link.
- To change the state of link management, select the On or Off radio button.
- To turn automatic link updating on, select the On radio button. You can only turn this on when link management is on.
- Click OK to apply your change.
- Restart your server.
To deactivate link management, select the Off
radio button. This clears the link status information so that when you
try to check links in Web Publisher, you get an error message, and you
cannot access any link status information.
To reactivate link management, select the On
radio button. This starts link management up again, which creates a new
empty link status database. To get link status information, you must again
check links for all your files. Links that have changed status since you
turned link management off may have to be manually fixed.
This starts up automatic link updating, which revises links from or to files that are subsequently moved or renamed. It does not, however, affect the links in any files that were moved or renamed while automatic link updating was turned off.
Setting the version control archive
Netscape Web Publisher includes a version control system for keeping track of files and documents as they are updated and changed. Web Publisher manages version control for you, allowing you to compare different versions of a file, providing version history for any file under version control, and automatically incrementing version numbers for files edited under version control.For further information about version control in Web Publisher, access the online Netshare & Web Publisher User's Guide through the Help menu command in Web Publisher or the Help button on the search interface, the Agent Services page, or the Web Publisher Services page.
Files under version control are stored in an archive directory. The path in the default installation is server_root/plugins/content_mgr/archive. Web Publisher uses this archive to store all files under version control.
- Note
If you are changing the archive directory but keeping the version history intact, you must have (a) already created the new directory, (b) moved the version history files to the new directory as mentioned in step 2, and (c) deleted the old archive directory. If you don't want to keep the old version history, you don't need to move the files to the new directory, but you must do the other two steps (a and b) or this function will fail.
- Stop the server. Use the Server Preferences On/Off form or simply click the green light ON indicator for your server instance at the Server Administration page.
- Move your current version control directory to the desired new location.
- From the Server Manager, choose Web Publishing.
- Click the Version Control link.
- Type the full path for the archive directory in the Archive Path field.
- Click OK to set the archive directory.
- Restart the server.
Unlocking files
If a file that has been locked in Web Publisher is required for another user, you can unlock it. This is true for files that were locked manually by the client or automatically by Web Publisher as part of an edit or download operation.For further information about locking and unlocking files in Web Publisher, access the online Netshare & Web Publisher User's Guide through the Help menu command in Web Publisher or the Help button on the search interface, the Agent Services page, or the Web Publisher Services page.
Be cautious in using this function because by unlocking a file that was locked, you are forcing the file to be available for editing by other users. This is contrary to the intent of the lock owner, who may not know of the unlocking operation.To unlock a file:
- From the Server Manager, choose Web Publishing.
- Click the Unlock File link.
- The Choose field displays the currently selected file or directory.
- Click OK to unlock the file.
If you want to unlock a different file or a file from another directory, click the View button to see a list of resources. You can unlock files that are listed or you can view the files in a listed directory, and select one of those files. Once you click the unlock link for a file, you return to the Unlock File form and the filename appears in the Choose field.
Note
You cannot use this form to unlock a file that begins with a period (as in .cshrc), a plus (+), an equals sign (=), an ampersand (&), or any hexadecimal character. You have to log into Web Publisher as the user and unlock the file there.
Adding custom properties
As server administrator, you can add your own custom Web Publisher file properties. These properties are added to the default set of file properties stored in the web publishing collection. Server clients can view visible custom properties in Web Publisher and use them in their document searches.For further information about viewing and modifying properties in Web Publisher, access the online Netshare & Web Publisher User's Guide through the Help menu command in Web Publisher or the Help button on the search interface, the Agent Services page, or the Web Publisher Services page.
There is a limit to the number of each type of property you can have. These are the default settings:
- Text (a maximum of 30).
- Numeric (a maximum of 5).
- Date (a maximum of 5). Dates are formatted as month/day/year, and year can be two or four digits.
- Note
If you want to add another custom property after creating the maximum number of custom properties for a given type, you cannot remove an existing custom property and "reuse" the property's slot in the collection by adding a new custom property of the same type. For example, if you want to add a numeric property after 5 have already been created, you cannot delete one of the existing 5 numeric properties and add another numeric property in its place. The only way to use the new property is to remove the entire collection and recreate it with the new property.
This means that if you extend the maximum settings to add additional attributes, you cannot automatically use the new attributes in the existing web publishing collection. To allow this, you must use your file system to remove both the web_htm and link_mgr collection files from the search collections directory and then restart your server to automatically create a new web publishing collection for you. (The link_mgr collection is an internal file that's part of web publishing.)
- From the Server Manager, choose Web Publishing.
- Click the Add Custom Properties link.
- Type a name in the Property Name field. The name has these restrictions:
- It cannot duplicate an existing Web Publisher property name.
- It cannot exceed 128 characters.
- It cannot be "." or ".." or contain spaces.
- It cannot contain an underscore.
Note
For modifiable custom properties defined as META-tagged attributes, the value in the document is extracted only the first time the document is indexed. Because users can input a different value in the attribute field through the Web Publisher Services Properties page, the server ignores the META-tagged value in subsequent indexing. In this way, the user's value is not overwritten.
Note
Because all attributes tagged with META are defined as text, sorting operations on fields containing dates or numbers do not sort in the expected date or number order. With this feature, you can redefine META- tagged attributes to dates or numeric values to obtain valid sort sequences.
Managing properties
You can list all the file properties that are available for use. These include the default set plus any new custom properties you have created. You can remove or edit only those properties that you have created. These have active Remove and Edit links in the first two columns.- From the Server Manager, choose Web Publishing.
- Click the Manage Properties link to obtain a listing of all available properties.
- Click the Remove link for the property. The Remove Custom Property form appears.
- Click OK to remove the property. Click Back to return to the Manage Properties page without removing the property.
- Click the Edit link for the property. The Edit Custom Property form appears.
- Change the property as needed. You can only change the property's name, permissions, visibility and its option of whether to capture META-tagged attributes.
- Click OK to update the property with your changes. Click Back to return to the Manage Properties page without editing the property. Click Reset to reset any property values you changed.
Customizing your Netshare home page
By default, a user's Netshare home page displays the netshare.html file in the right frame. Initially this HTML file contains mostly text and a few sample links, but you or your users can revise this file to contain other text, graphics, links, and other HTML elements.This file is the starting point for a user's workspace on the remote server and is what other users first see when they access the user's home page. You or the owner of the home page may want to provide some explanation of what other files, folders, and services are available through the home page and display some navigational links to route other users through the site.
This is the default set of files that is installed in a Netshare home directory:
- netshare.html - The default text that appears in the right frame.
- banner.html - The banner across the top.
- home.html - The frameset itself.
- menu.html - The set of links in the left frame.
- test1.html - A sample file.
- test2.html - A sample file.
Customizing the Web Publisher user interface
Web Publisher uses a standard set of default properties to describe its files and folders. These properties are listed in the Manage Properties form and are used in the HTML forms that the Web Publisher user sees.As server administrator, you can customize these forms to meet specific user requirements. These forms are defined as a set of modifiable pattern files that contain pattern variables for the Web Publisher properties. These variables are named by taking the attribute name defined in the dblist.ini file (located in the yourServer/plugins/search.admin directory) and adding the prefix $$. For example, you can $$ to the variable CM_LOCK_OWNER to create the $$CM_LOCK_OWNER variable for displaying the lock owner in an HTML pattern file.
The Web Publisher attributes
To understand how these work, look at the dblist.ini file that came as part of the default installation of your server. You can see there a series of attributes called NS-idxattr1 through NS-idxattr27. These are the default Web Publisher attributes and they follow a standard syntax:NS-idxattrn=CM_attributeName;displayName;TYPE;sizewhere
- n = attribute number
- attributeName = internal attribute name
- displayName = name displayed in Manage Properties form
- TYPE = TXT (text), NUM (numeric), or DAT (date)
- size = size of field
The Web Publisher pattern files
The Web Publisher pattern files use the Web Publisher pattern variables to display values, and to pass values between the user's system and the remote server. The pattern files use a combination of HTML syntax and JavaScript to define additional variables and to display information to the user.These default Web Publisher pattern files are in the yourServer/plugins/content_mgr/ui/text/en directory on an English language server:
- main.pat - displays the 3-paned Web Publisher Services interface
- toc.pat - displays the left-hand set of links and buttons displayed for a file
- dirtoc.pat - displays the left-hand set of links and buttons displayed for a folder (version history is omitted)
- sys-prop.pat - displays the properties form for a file
- dirps.pat - displays the properties form for a folder
- version.pat - displays the version history form for a file
- links.pat - displays the check links form for a file
- dirlink.pat - displays the check links form for a folder
- usrps.pat - displays the custom properties form
A good place to begin customizing the interface is by modifying the existing pattern files. After you see how they work and you understand pattern variables, you can create your own pattern files and change the configuration files and other pattern files to point to them.
There are three kinds of Web Publisher pattern variables:
- those defined in the configuration file, dblist.ini, as an index attribute (NS-idxattr)
- those defined as pointers to other forms, with "-NS" suffix
- those defined internally by Web Publisher
Pointing pattern variables
There are some pattern variables that point at specific files and displays them in one of the frames in the browser. The pointer variables that you can use in your pattern file are listed in Table 2.| Variable name | Result |
|---|---|
| $$CM_CUSTOM_FEILD_NS | Custom properties form (gets data for it) |
| $$CM_HTML_REND_NS | The right frame displays the HTML version of the file |
| $$CM_LINK_INFO_NS | Link status form |
| $$CM_SYS_PROP_NS | Properties form |
| $$CM_TOC_NS | Left-hand frame |
| $$CM_USR_PROP_NS | Custom properties form (posts data from it) |
| $$CM_VER_DIFF_NS | Compare versions form |
| $$CM_VER_INFO_NS | Version history form |
| $$CM_VER_LINKS_NS | Check links form |
| $$CM_WEBPUB_NS | Web Publisher applet |
Conditional variables
You can set up a search to use a variable conditionally so that if there is no value associated with the variable, nothing is displayed. The syntax is as follows:variableName[conditionalized output]For example, you could request that the document's title be output if it exists. If there is no title for this document, not even the label "Title:" is to be displayed. To do this, you would use code like this:
$$Title[<P>Title: <B>$$Title</B>]
Figure 1 shows the file properties page displayed by the sys-prop.pat pattern file. The fields for Owner, Title, Author, Lock Status, URL, and so on are all defined in the pattern file. Most of the variables are in the dblist.ini file, but there are a few that are defined by Web Publisher.
Figure 1: The Web Publisher file properties page
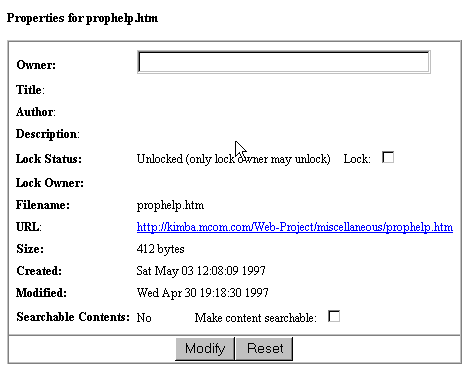
To see how these work together, here are some of the more interesting lines from the file properties pattern file, sys-prop.pat, that define various fields and their labels:
<TD><B>Owner:</B></TD>
<TD><input name="CM_OWNER" value="$$CM_OWNER" size="40"</TD>

<TR VALIGN=BASELINE><TD NOWRAP><B>Title</B>:</TD><TD>$$Title</TD></TR>
<TR VALIGN=BASELINE><TD NOWRAP><B>Author</B>:</TD><TD>$$CM_AUTHOR</TD></TR>
<TR VALIGN=BASELINE><TD><B>Lock Status:</B></TD>
<TD>$$CM_LOCK_STAT (only lock owner may unlock) <SPACER type=horizontal size=10></SPACER>
$$CM_LOCK_VAL:<SPACER type=horizontal size=5></SPACER>
<INPUT TYPE="checkbox" NAME="CM_LOCK_STAT" ><BR></TD></TR>
$$IF_DOC_HAS_RENDITON[
<TD NOWRAP><B>Rendition</B>:</TD>
<TD><A HREF="$$CM_URL?$$CM_HTML_REND_NS">HTML</A></TD>
</TR>
]
Notice these aspects:
- The owner field is limited to 40 characters.
- The title and author fields are read-only.
- The lock status information a checkbox with its own associated label that varies depending on whether the file is already locked or unlocked, as indicated by the value of $$CM_LOCK_VAL.
The Rendition field only appears for files that have renditions available. It includes a pattern variable that points to the HTML version of the file and shows it in the right frame.
Copyright 1997 Netscape Communications Corporation. All rights reserved.