Be User's Guide: DriveSetup
| The Be User's Guide Table of Contents |
Customizing the BeOS: DriveSetup
DriveSetup lets you work with any type of disk drive supported by the
BeOS.
You can mount, unmount, format, partition, eject,
and initialize disks connected to your computer.
Some important terms to remember:
- A disk drive is a physical device; e.g., a SCSI or IDE hard drive.
- You can partition a disk into multiple volumes.
- A volume is a logical device. A single hard drive can have multiple volumes; e.g., one for Windows or Mac OS and one for the BeOS.
 |
WARNING: It's possible to lose data accidentally in DriveSetup (by initializing a drive, for example). Pay attention to warning dialogs to avert a catastrophe. |
DriveSetup Features
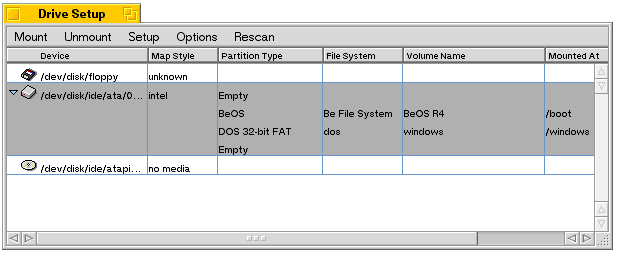
The Drive Setup window shows the drives currently attached to the system, whether mounted or not. The window below shows three drives connected to the computer: a floppy, a hard drive, and a CD drive. A small triangle appears next to partitioned drives with multiple volumes. Click the triangle to see all the volumes on that drive.
The table below identifies and describes the information displayed in the Drive Setup window:
| Name | Shows this |
|---|---|
| Device | Lists the SCSI, IDE, or floppy drive devices you can mount on this computer. |
| Map Style | Identifies the partition style. Currently the BeOS supports two styles: Apple and Intel. |
| Partition Type | The specific partitions on a given volume. The BeOS recognizes BeOS, DOS 16-bit and 32-bit, Macintosh HFS (Hierarchical File System), ISO 9660, and "ofs" (Old Be File System) partitions. |
| File System | Shows the specific file system for each volume. |
| Volume Name | The name for each volume on a drive. |
| Mounted At | Shows the path to the mounted volume. |
| Size | Shows the size of each device and/or volume (doesn't appear in the screenshot). |
Mounting and Unmounting Volumes
Mounting means displaying a drive or volume on your desktop. A volume must be mounted for you to be able to read it and write to it. To mount a volume:
- Launch DriveSetup.
- Select the device you want to mount: e.g., floppy, CD, Zip drive, etc.
- Select the Mount menu (or pop up the context menu on the drive you want to mount). You can choose to mount all partitions or a specific type of volume.
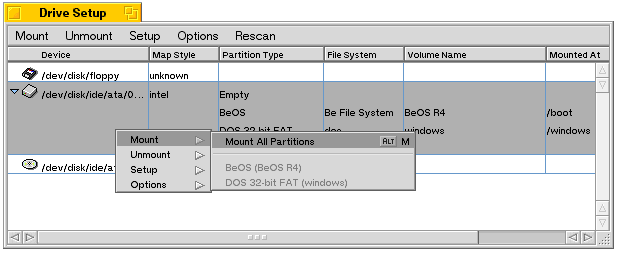
To unmount a volume, follow the same steps, selecting the Unmount menu.
Partitioning a Disk
|
WARNING: Partitioning a disk destroys all the data on it! Back up data you want to keep before partitioning the disk. |
DriveSetup can create multiple partitions on a disk, except floppy disks (which are too small to partition) and read-only media like CD-ROMs. You partition your hard drive to allocate a portion of it to the BeOS. You can create either Intel- or Apple-style partitions in DriveSetup.
 |
NOTE: The drive or volume you want to partition must be unmounted. |
 Creating Intel-Style Partitions
- In the DriveSetup panel, choose Partition from the
Setup menu.
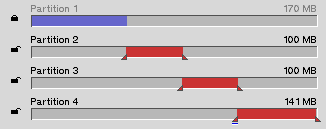
The Partition Map panel lets you create as many as four partitions.
- Set the partition type in the top part of the Partition Map,
using the Type popup list, or enter the number manually,
if you know it.
- Check the Active box of the partition you want to
make active; only one partition can be active at a time.
- Set the layout of your partitions in the bottom part of the window.
Click the Layout button to choose from four preset configurations.
You can also set the partition size manually by dragging the sliders in each
partition bar.
The minimum partition size for the BeOS is 200 MB.
- The lock icons at the left end of the partition bars are there to keep
you from accidentally losing data in partitions that you don't wish to modify.
Click the icon to unlock it.
A dialog warns that you may lose data if you modify the partition.
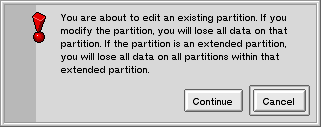
As further protection against losing data, the color of the partition bar changes from blue to red when the change you're making to a partition's size is about to cause you to lose data.
- After you've the configured the partitions, click OK to partition the drive.
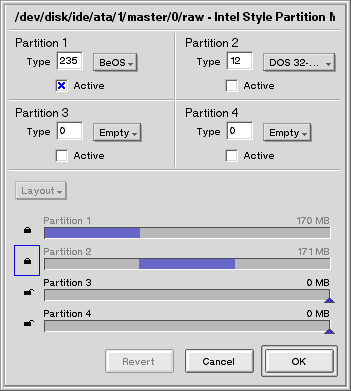
To use your new partitions, you have to mount them.
Creating Apple-Style Partitions
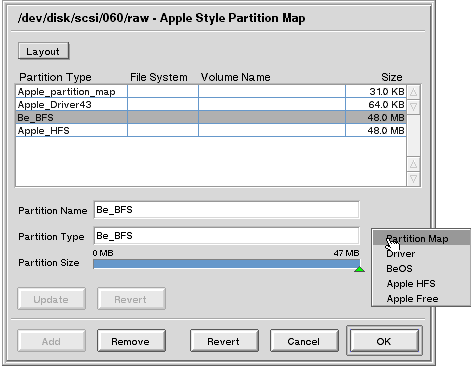
- In DriveSetup, choose Partition from the Setup menu.
- In the Partition Map panel that appears, click the Layout button
to choose one of four preset configurations.
You can alter preset configurations by clicking on a preset partition and changing the name,
type, or size.
WARNING: Use only one of the preset partition types in the pop-up menu or your partition will not be recognized by the BeOS or MacOS. - To change the partition size move the slider left to increase or right
to decrease the size.
If you change the size, you should click update to see the new sizes of all the partitions.
- You can also add or remove partitions with the Add and Remove buttons at the bottom of the window. After you configure the partitions, click OK to partition the drive. A dialog warns that you may lose all the data on your disk; continue only if you are sure you want to erase the disk.
Initializing a Disk
Initializing a disk prepares it for data in a certain file system format; e.g., Mac HFS, DOS, BeOS. You must initialize a new BeOS partition before you can write data to it:
- In DriveSetup, select the disk or volume to initialize and unmount it.
- Select Initialize from the Setup menu.
Your initialization choices are Be File System, dos
(Intel), Mac HFS, ISO 9660, or the Old Be File System.
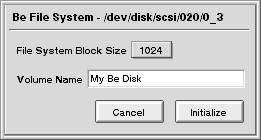
- A dialog that lets you name the volume and set the file system block size appears. The default size is 1024; this gives the best performance in most cases. If you will have only a few very large files (and you know what you're doing) you might want to increase the system block size.
Formatting a Disk
|
WARNING: Formatting a disk destroys all data on that disk. Back up data you want to keep before formatting the disk. |
Formatting is a time-consuming and humiliating process. You should attempt it only if initialization fails.
- In DriveSetup, select and unmount the disk you want to format.
- Select Format from the Setup menu. In the warning dialog that appears click Format to proceed.
for BeOS Release 4.5.
Copyright © 1999 Be, Inc. All rights reserved.